Strategy ONE
Defining attribute relationships
After you have created attributes for your project, you can define attribute relationships to determine how the engine generates SQL, how tables and columns are joined and used, and which tables are related to other tables.
You link directly related attributes to each other by defining parent-child relationships. Attribute elements, or the actual data values for an attribute, dictate the relationships that you define between attributes.
The parent-child relationships that you create determine the system hierarchy within the project.
The four types of direct relationships that can exist between attributes include one-to-one, one-to-many, many-to-one, and many-to-many. For information on these direct relationships and steps to define them with the Attribute Editor, see Attribute relationships.
You can also use Architect to define relationships between attributes. Architect can provide a more intuitive and helpful workflow that allows you to view and modify multiple attributes as you define attribute relationships.
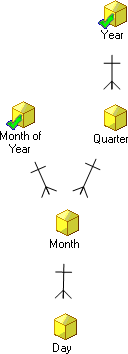
For example, in the MicroStrategy Tutorial project, the Time hierarchy includes relationships between the attributes Year, Quarter, Month of Year, Month, and Day. With Architect, rather than defining parent and child relationships for one attribute at a time, you can define the relationships between these attributes at the same time in a visual environment.
The steps below show you how to manually define parent and child relationships between attributes, and also provides an example scenario of creating the relationships between the attributes Year, Quarter, Month of Year, Month, and Day in the MicroStrategy Tutorial project.
You can also allow Architect to automatically define attribute relationships based on the design of your data, as described in Automatically defining attribute relationships.
Prerequisite
-
Attributes have been created for your project.
To define attribute relationships
-
In MicroStrategy Developer, log in to a project.
For the example scenario, log in to the MicroStrategy Tutorial project.
-
From the Schema menu, select Architect.
-
If a message is displayed asking if you want to open Architect in read only mode or edit mode, select Edit and click OK to open Architect in edit mode so that you can make changes to the project. MicroStrategy Architect opens.
-
If you are only given the option of opening Architect in read only mode, this means another user is modifying the project's schema. You cannot open Architect in edit mode until the other user is finished with their changes and the schema is unlocked.
-
For information on how you can use read only mode and edit mode for various schema editors, see Using read only or edit mode for schema editors.
-
-
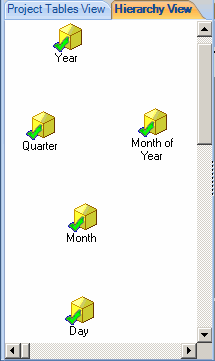
From the Hierarchy View, on the Home tab, in the drop-down list on the Hierarchy area of the toolbar, select System Hierarchy View. The system hierarchy is displayed.
-
Prior to defining any relationships, you should gather the attributes that you want to relate to each other in the same area within the Hierarchy View of Architect. For example, the attributes Year, Quarter, Month of Year, Month, and Day in the MicroStrategy Tutorial project are gathered close together in the Hierarchy View, as shown below.
To create an attribute relationship
-
Select an attribute that is to be a parent attribute in an attribute relationship. Drag from the middle of the attribute to an attribute that is to be a child of the parent attribute selected. A one-to-many relationship line is created between the two attributes.
For example, in the image below a relationship is created between the Year and Quarter attributes in which Year is a parent attribute of Quarter.
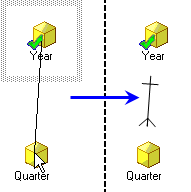
In the example above, the Year attribute is the parent attribute of Quarter.
-
Attribute relationships created in this way are created as one-to-many relationships by default. To modify the relationship type, right-click the relationship line and select from one of the relationship types listed below:
-
One-to-one
-
One-to-many
-
Many-to-one
-
Many-to-many
For information on these relationship types, see Attribute relationships.
-
-
A table in which both attributes exist is chosen as the table to support the attribute relationship. To modify the relationship table, right-click the relationship line, point to Relationship table, and select a table.
To define attribute relationships with other techniques
If you are finished defining attribute relationships, you can save your changes and close Architect. The rest of this procedure describes how to define attribute relationships with other techniques and completes the example scenario.
-
Right-click the Quarter attribute, and select Edit Children Relations. The Children Relations dialog box opens and lists attributes that can be related to the Quarter attribute.
-
For the Month attribute, in the Relationship type drop-down list, select One-to-many. You can select any of the available relationship types from the Relationship type drop-down list to create the required relationship.
-
For the Month attribute, in the Relationship table drop-down list, keep the default of LU_MONTH.
-
Keep the Relationship type drop-down list at None for the other attributes listed. Quarter is not directly related to any of these attributes.
-
Click OK to close the Children Relations dialog box and create the attribute relationship between Quarter and Month.
-
Drag from the middle of the Month of Year attribute to the Month attribute. A one-to-many relationship line is drawn between the two attributes.
-
Drag from the middle of the Month attribute to the Day attribute. A one-to-many relationship line is drawn between the two attributes.
This completes the definition of the required attribute relationships, as shown below.