MicroStrategy ONE
Controlling the display of attribute elements
The sections listed below describe various techniques to control the display of attribute elements:
Locked/Unlocked attribute elements
Locking a hierarchy prevents a user from viewing all elements of the specific attribute and any lower level attributes in the hierarchy. A hierarchy is referred to as locked when at least one attribute within that hierarchy has the Element Display option set to Locked. Anything higher in the hierarchy is still visible.
You can lock the hierarchy to restrict the user from viewing elements and lower level attributes for security reasons or to better manage lengthy hierarchies. By restricting the view of attribute elements and lower level attributes in the Data Explorer, you can prevent the expansion of long attribute element lists that can consume system resources. When you set the element display to locked, a padlock icon appears next to the attribute name.
For example, the attribute Order is locked in the Data Explorer sample shown below.
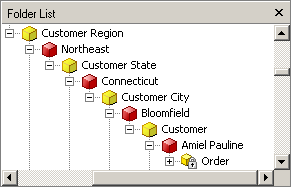
While the user can view the attribute elements of Customer Region and Customer City, he or she cannot view information about each customer's order. The Order attribute may be locked in order to prevent unauthorized users from accessing sensitive information about customer orders.
Prerequisites
A hierarchy has been created.
To lock or unlock an attribute in a hierarchy
-
In MicroStrategy Developer, open a hierarchy using either the Hierarchy Editor or Architect, as described below:
-
Locate a hierarchy in the Folder List, right-click the hierarchy, and select Edit. The Hierarchy Editor opens.
-
From the Schema menu, select Architect. MicroStrategy Architect opens.
From the Hierarchy View, in the Hierarchies drop-down list, select a hierarchy.
If a message is displayed asking if you want to use read only mode or edit mode, select Edit and click OK to open the schema editor in edit mode so that you can make changes to the hierarchy.
If you are only given the option of using read only mode, this means another user is modifying the project's schema. You cannot use edit mode until the other user is finished with their changes and the schema is unlocked.
For information on how you can use read only mode and edit mode for various schema editors, see Using read only or edit mode for schema editors.
-
-
Lock or unlock an attribute using the options listed below:
-
To lock an attribute, right-click an attribute, point to Element Display, and then select Locked. A padlock icon appears next to the locked attribute, and users can no longer view elements of this attribute.
-
To unlock a locked attribute, right-click an attribute, point to Element Display, and then select Unlocked. The padlock icon is removed from the attribute, and users can now view the elements of this attribute.
-
-
In the Hierarchy Editor or Architect, click Save and Close to save your changes and return to Developer.
-
From the Schema menu, select Update Schema.
You can also lock and unlock attributes when you edit them in the Display tab of the Attribute Editor. However, this locks and unlocks the attributes within the system hierarchy, not any user hierarchies that contain the attributes. For example, if the attribute Year is locked in the Attribute Editor, no elements for Year display in the Data Explorer when Year is expanded.
Limited attribute elements
Another way to restrict users from viewing attribute elements in the Data Explorer is to limit the number of elements that appear at one time. This method is useful when there are extensive attribute elements in a hierarchy. Instead of loading all attribute elements at once, you can set the limit to five or ten at a time. Also, retrieving a large number of elements at once can negatively impact system performance. The user can then click the arrows to see the next set of elements for that attribute.
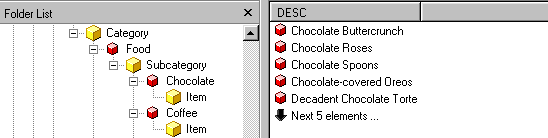
For example, the Chocolate subcategory, shown below, contains many items. Rather than displaying all of them at once and overwhelming the user, a limit of five items has been set. The following graphic displays this view in the Data Explorer.
Prerequisites
A hierarchy has been created.
To limit the display of attributes in a hierarchy
-
In MicroStrategy Developer, open a hierarchy using either the Hierarchy Editor or Architect, as described below:
-
Locate a hierarchy in the Folder List, right-click the hierarchy, and select Edit. The Hierarchy Editor opens.
-
From the Schema menu, select Architect. MicroStrategy Architect opens.
From the Hierarchy View, in the Hierarchies drop-down list, select a hierarchy.
If a message is displayed asking if you want to use read only mode or edit mode, select Edit and click OK to open the schema editor in edit mode so that you can make changes to the hierarchy.
If you are only given the option of using read only mode, this means another user is modifying the project's schema. You cannot use edit mode until the other user is finished with their changes and the schema is unlocked.
For information on how you can use read only mode and edit mode for various schema editors, see Using read only or edit mode for schema editors.
-
-
Right-click the attribute to limit, point to Element Display, and then select Limit. The Limit dialog box opens.
-
Type the number of elements to display at one time and click OK.
-
In the Hierarchy Editor or Architect, click Save and Close to save your changes and return to Developer.
-
From the Schema menu, select Update Schema.