MicroStrategy ONE
Inputs for Predictive Metrics
A predictive metric can be created using attributes and metrics as its inputs. How you define the attributes and metrics you use as inputs for your predictive metrics affects the resulting predictive metrics, as described in:
- Attributes as Inputs for Predictive Metrics
- Level Metrics as Inputs for Predictive Metrics
- Conditional Metrics as Inputs for Predictive Metrics
Attributes as Inputs for Predictive Metrics
Attributes can be used as inputs for predictive metrics. Data mining often analyzes non-numeric, demographic, and psychographic information about customers, looking for attributes that are strong predictors.
For example, your MicroStrategy project contains a Customer attribute with related attributes for age, gender, and income. You can include an attribute, such as the Customer attribute, directly in a training metric, as described in Creating a Predictive Model Using MicroStrategy.
By including an attribute directly in a training metric, a predictive metric is then created that includes the attribute as one of its inputs. When using attributes directly in training metrics to create predictive metrics, be aware of the following:
- The
IDattribute form for the attribute is used by the training metric to include the attribute information in a predictive metric. If attributes include additional attribute forms other than theIDform that are to be used as inputs for predictive metrics, you can create metrics based on these attribute forms. Once these metrics are created, they can then be used as inputs for predictive metrics. This scenario for creating attribute-based predictive metrics is described in Creating Metrics to Use Additional Attribute Forms as Inputs for Predictive Metrics below. - Attribute forms must use a text or numeric data type. If the attribute form uses a date data type, the data cannot be correctly represented when creating the predictive metric. If an attribute form uses date values, you must convert the date values into a numeric format to use the attribute form to create predictive metrics.
Creating Metrics to Use Additional Attribute Forms as Inputs for Predictive Metrics
If attributes include additional attribute forms other than their ID form that are to be used as inputs for predictive metrics, you can create metrics based on these attribute forms. The resulting metric can then be used as an input for a predictive metric, thus allowing the attribute information to be included in a predictive metric.
The steps below show you how to create a metric based on an attribute form. The resulting metric, which contains the attribute information, can then be used to create a predictive metric.
This procedure assumes you are familiar with the process of creating a metric. For steps on how to create metrics, see Advanced Metrics.
To Create Metrics to Use Additional Attribute Forms as Inputs for Predictive Metrics
- Using the Metric Editor, create a new metric expression. All metric expressions must have an aggregation function. To support including attribute information in the metric expression, in the Definition area, type
Max()to use the Max aggregation function. - Within the parentheses of the
Max()aggregation function, specify the desired attribute form using theAttributeName@FormNameformat, where: AttributeName: Is the name of the attribute. If there are spaces in the attribute name, you can enclose the attribute name in square brackets ([]).FormName: Is the name of the attribute form. Be aware that this is different than the attribute form category. If there are spaces in the attribute form name, you can enclose the attribute form name in square brackets ([]).In the image shown below the Discount form of the Promotion attribute is included in the metric.
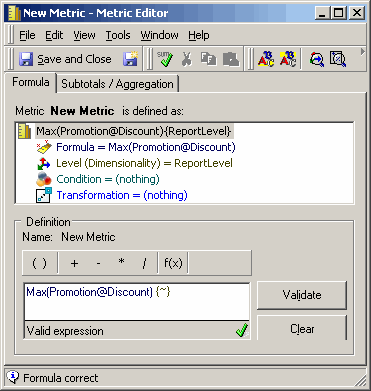
- Add the attribute as a metric level so that this metric always returns results at the level of the attribute.
-
If the predictive metric is to be used to forecast values for elements that do not exist in your project, you must define the join type for the metric used as an input for the predictive metric to be an outer join. For example, the predictive metric is planned to forecast values for one year in the future. Since this future year is not represented in the project, you must define the join type for the metric used as an input for the predictive metric to be an outer join so that values are returned.
To enable outer joins to include all data:
- Choose Tools > Metric Join Type.
- Clear the Use default inherited value check box.
- Select Outer.
- Click OK.
- If you plan to export predictive metric results to a third-party tool, you should define the column alias for the metric used as an input for the predictive metric. This ensures that the name of the metric used as an input for the predictive metric can be viewed when viewing the exported results in the third-party tool.
To create a metric column alias to ensure the column name matches the metric's name:
- Choose Tools > Advanced Settings > Metric Column Options.
- In the Column Name field, type the alias.
- Click OK.
- Save the metric, using the alias from the previous step as the metric name. You can now include the metric in a training metric to create a predictive metric, as described in Creating a Predictive Model Using MicroStrategy.
Level Metrics as Inputs for Predictive Metrics
The attribute used on the rows of the dataset report sets the level of the data by restricting the data to a particular level, or dimension, of the data model.
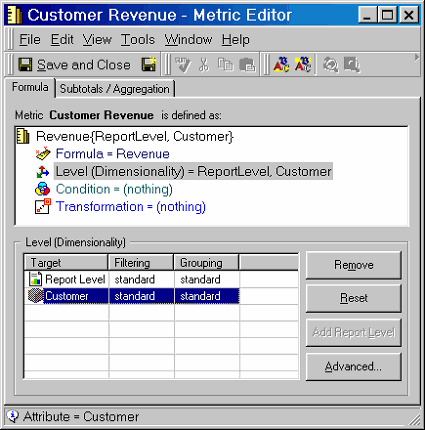
For example, if the Customer attribute is placed on the rows and the Revenue metric on the columns of a report, the data in the Revenue column is at the customer level. If the Revenue metric is used in the predictive model without any levels, then the data it produces changes based on the attribute of the report using the predictive metric. If Year is placed on the rows of the report described previously, the predictive metric calculates yearly revenue rather than customer revenue. Passing yearly revenue to a predictive model based on customer revenue yields the wrong results.
This problem can be easily resolved by creating a separate metric, which is then used as an input for the predictive metric. This separate metric can be created to match the metric definition for Revenue, but also define its level as Customer. This approach is better than adding a level directly to the Revenue metric itself because the Revenue metric may be used in other situations where the level should not be set to Customer. Such a metric would look like the following.

This procedure assumes you are familiar with the process of creating a metric. For steps on how to create metrics, see Advanced Metrics.
To Create Level Metrics to Use as Inputs for Predictive Metrics
- In the Metric Editor, open the metric that requires a level.
- Clear any Break-by parameters that may exist on the metric's function:
- Highlight the function in the Definition pane to select it.
- Right-click the function and then select Function_Name parameters.
- On the Break By tab, click Reset.
- Click OK.
- Add the necessary attributes as metric levels:
- Click Level (Dimensionality) on the Metric component pane.
- In the Object Browser, double-click each attribute to add as a level.
- If the predictive metric is to be used to forecast values for elements that do not exist in your project, you must define the join type for the metric used as an input for the predictive metric to be an outer join.
For example, the predictive metric is planned to forecast values for one year in the future. Since this future year is not represented in the project, you must define the outer join type for the metric used as an input for the predictive metric so that values are returned.
To enable outer joins to include all data:
- Choose Tools >Metric Join Type.
- Clear the Use default inherited value check box.
- Select Outer.
- Click OK.
- If you plan to export predictive metric results to a third-party tool, you should define the column alias for the metric used as an input for the predictive metric. This ensures that the name of the metric used as an input for the predictive metric can be viewed when viewing the exported results in the third-party tool.
To create a metric column alias to ensure the column name matches the metric's name:
- Choose Tools > Advanced Settings > Metric Column Options.
- In the Column Name field, enter the alias.
- Click OK.
- Save the metric with the alias name from the previous step. You can now include the metric in a training metric to create a predictive metric, as described in Creating a Predictive Model Using MicroStrategy.
Conditional Metrics as Inputs for Predictive Metrics
To group a metric's results by an attribute, create a conditional metric for each category. For example, you want to use customer revenue grouped by payment method in your data mining analysis. If you place the Customer attribute on the rows of the report, the Revenue metric on the columns, and the Payment Method attribute on the columns, you get the following report as a result:
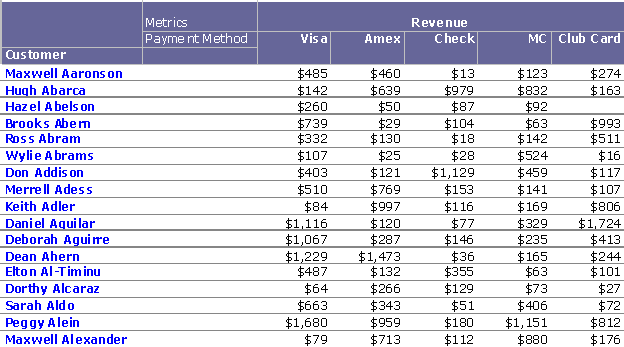
However, this report presents problems if it is used as a dataset report because multiple headings are generated for all the columns, specifically, Revenue and each Payment Method. Additionally, each column is revenue for a particular payment method and unless there is a metric that matches this definition, it is difficult to successfully deploy any model that uses one of these columns.
To solve this problem, create a separate metric, which is then used as an input for a predictive metric, that filters Revenue for each Payment Method. This has the same definition as the original Revenue metric, but its conditionality is set to filter Revenue by a particular Payment Type.
This procedure assumes you are familiar with the process of creating metrics and filters. For steps on how to create metrics, see Advanced Metrics. For steps on how to create filters, see Advanced Filters: Filtering Data on Reports.
To Create a Conditional Predictive Metric
- Create a separate filter for each of the necessary attribute elements.
For the example above, they are Payment Method = Visa, Payment Method = Amex, Payment Method = Check, and so on.
- For each metric, create a separate metric to be used as an input for a predictive metric, as explained in the section above.
- Add the filters you created as conditions of the metric-based predictive input metric.
- Save the metric. You can now include the metric in a training metric to create a predictive metric, as described in Creating a Predictive Model Using MicroStrategy.
The following report uses conditional metrics to generate the same results as the first report but in a dataset report format.
