MicroStrategy ONE
Apply a View Filter to a Report
Once a report is displayed, you can narrow its results by applying a View filter to the report. The View filter can include one or more filtering conditions that restrict the data displayed in the original report. Unlike the report filter, once the View filter is applied it does not retrieve data from the data source. Instead, a View filter restricts data based only on the report results already displayed on the screen.
You can create a view filter by qualifying on any attribute or metric on your report. While attribute and metric qualifications both restrict the data displayed on the report, they are both created and defined in slightly different ways.
You can create a view filter in any report. This includes reports connected to an Intelligent Cube, reports returning information directly from a data warehouse, Freeform SQL reports returning information from Excel spreadsheet, and so on.
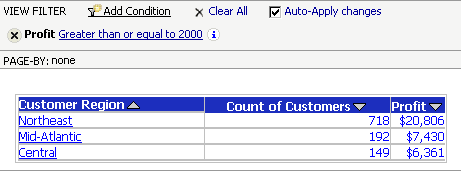
For example, in the report below, the View filter is applied after the original report was executed. The original report included data for all seven regions. When the View filter condition is applied, the only data displayed on the report is for regions that generated more than $2,000 in profit. Therefore, only three of the original seven regions are displayed in the new report results.

For instructions to use view filters in documents, see the Document Creation Help.
To Filter Data Displayed on a Report Using the View filter
- Click the name of a report to execute it.
-
From the Tools menu, select View Filter.
If DHTML is disabled, from the View menu, select View Filter and click the Go icon
 .
. - In the View filter, click Add Condition.
-
From the Filter On drop-down list, select the object (attribute or metric) on which you want to base your filter.
If you want to create a custom filter expression, you can do so in MicroStrategy Developer. Contact your Administrator for more information.
- Depending on the type of object
you are filtering on, a different set of choices appears, as described
below:
- If you
are filtering based on an attribute, choose Qualify
to set a specific value-based condition, or choose Select
to choose attribute elements from a list.
- If
you choose Qualify,
choose whether to filter on the attribute's description (DESC) or ID
form. Then, select a comparison operator such as Greater than.
Enter a value in the field on the right to finish defining
the filter condition.
- To
compare the attribute to another attribute, click the
Attribute icon
 . Then select
another attribute to compare it to.
 - If you choose Qualify and are qualifying on a date-related attribute, you can either type the day in or select it from a calendar (if DHTML is enabled). Click the calendar icon next to the date field, then click on a date to select it.
- To
compare the attribute to another attribute, click the
Attribute icon
- If you choose Select, choose In List or Not in List to include or exclude items that appear in the Selected list. Then choose elements from the Available list and add them to the Selected list. You can use the Search for field to search for a particular attribute element. See How to Use Efficient Search Syntax.
- If
you choose Qualify,
choose whether to filter on the attribute's description (DESC) or ID
form. Then, select a comparison operator such as Greater than.
Enter a value in the field on the right to finish defining
the filter condition.
- If you
are filtering based on a metric, choose a comparison operator
such as Greater than, and type a value. To
compare the metric to another metric, click the Select Metric icon
 . Then select another
metric to compare it to.
- If you
are filtering based on an attribute, choose Qualify
to set a specific value-based condition, or choose Select
to choose attribute elements from a list.
- Click the Apply
icon
 to apply the new filter to the report.
