MicroStrategy ONE
Configuring MicroStrategy Mobile for Android to Receive Push Notifications
You can use alert-based subscriptions to ensure that users automatically receive notifications on an Android device with MicroStrategy Mobile when a metric on a report meets specific threshold conditions. You can create an alert-based subscription using the Alerts Editor in Web.
These alerts are "pushed" to MicroStrategy Mobile for Android by Intelligence Server. For information about how these push notifications are displayed on the device, see the MicroStrategy Mobile Analysis Help.
- MicroStrategy delivers alert notifications through the Google Cloud Message (GCM), which is a free service that enables developers to send messages between servers and client applications. For some customizations, you may need an API key obtained from Google Play Console.
- Your Intelligence Server must be able to connect to Google Cloud Message service either with direct connect or through a proxy, which can be configured through Developer.
- You must have MicroStrategy Distribution Services to use push notifications with MicroStrategy. For information about purchasing a Distribution Services license, contact your MicroStrategy account executive.
- Push notifications must be enabled on an Android device to receive MicroStrategy push notifications. In addition, the first time MicroStrategy Mobile for Android is opened on a device, the user is prompted to allow the application to receive push notifications.
- To enable security, it is recommended that Mobile Server be configured to use Secure Socket Layer (SSL) encryption. For detailed instructions on configuring Mobile Server to use SSL, see the Enabling Secure Communication chapter in the System Administration Help.
- Your Android device must have Google Play service.
High-Level Steps to Set Up Android Alert Push Notification Environment
-
Open MicroStrategy Developer settings for Intelligence Server.
If you are running MicroStrategy Developer on Windows for the first time, run it as an administrator.
Right‑click the program icon and select Run as Administrator.
This is necessary in order to properly set the Windows registry keys. For more information, see KB43491.
- From the Administrator menu select Delivery Message.
- Select Devices.
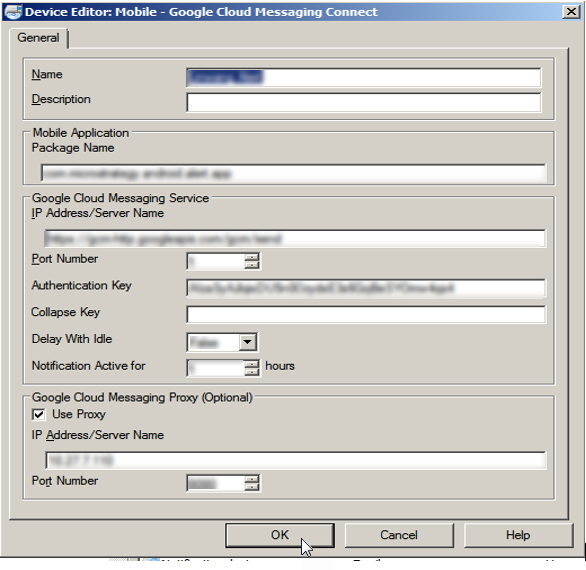
- Create a device with Mobile Client Android.
- In the Package Name field enter your Android application identity. (For out of the box build users, use the default name. For customized application user provide the package name.)
- Under the Google Cloud Messaging Services section, for IP Address and Port Number fields use the default values that display automatically.
- In the Authorization Key field enter the Application Programming Interface Key obtained from Google Developer Console. (For out of the box build user, use the default value. For customized application users provide the package name.)
- The Collapse Key field displays empty by default. (This parameter identifies a group of messages that can be collapsed in a way that only the last message gets sent when delivery is resumed. This is intended to avoid sending duplicates of the same message when the device comes back online or becomes active.)
- The Delay While Idle field defaults to "False." (When this parameter is set to "True", it indicates that the message should not be sent until the device becomes active.)
- In the Notification Active For (in hours) field indicate how long the message should be kept Google Cloud Message Storage if the device is offline. (The maximum time to live supported is 4 weeks. Since this amount is measured in seconds the default value appears as 1 hour.)
- The Google Cloud Message Proxy field is optional. If Intelligence Server cannot communicate with Google Cloud Messaging then select the check box and enter the IP Address of the proxy server.
-
Click OK.
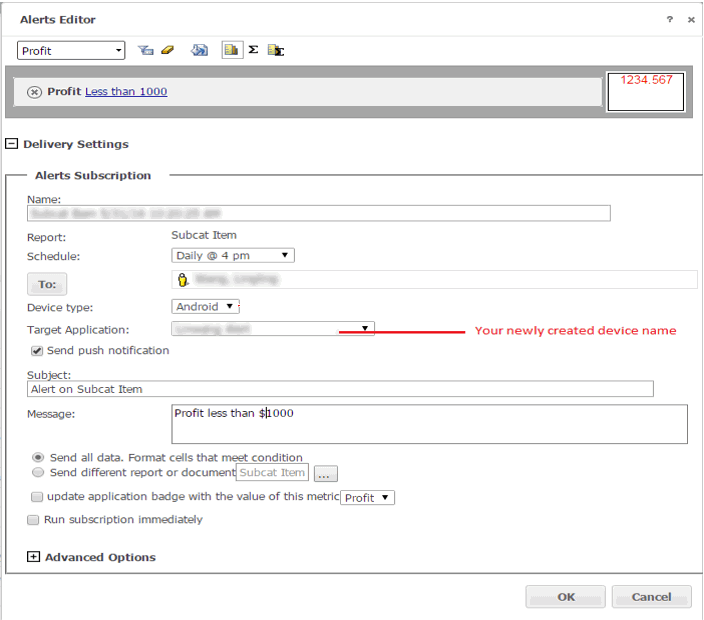
- Create Alert Subscription for Android device in Web Server:
- From Report menu select Alert.
- Select Mobile Notification. The Alert Editor dialogue box opens.
-
Select Android as the Device Type and enter the newly created device name as Target Application.
-
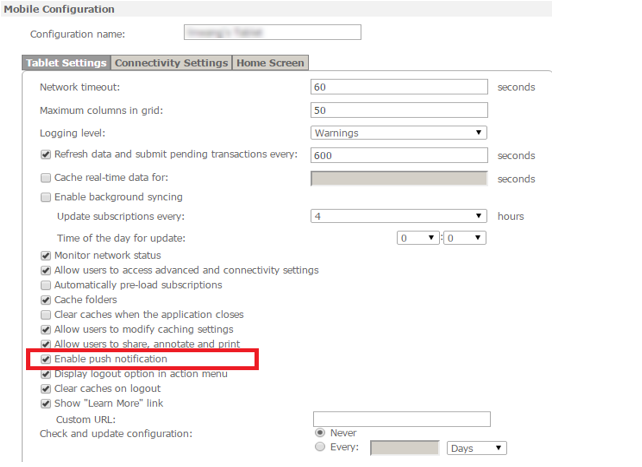
Open Mobile Configuration settings for Mobile Server and select the Enable push notification check box.
- Apply the mobile configuration on Android device. Once the alert is triggered, user receives alert subscription through the Android device.
How to Receive Notification Through Customized Application
- Open Android Studio and create a new SDK project.
- Select a configuration file to add to the new SDK project. The configuration file provides service-specific information for the application.
- To obtain the configuration file, select an existing project for the application or create new.
- A package name for the application must also be provided.
- Download google-services.json and copy into the application.
- Compile and distribute application.
High-level Steps to Enable MicroStrategy Push Notifications for Android
- In MicroStrategy Developer, create a Distribution Services device for Android. For detailed instructions, see the Scheduling Jobs and Administrative Tasks chapter in the System Administration Help, or see the Developer Help.
- Create a configuration for the application. In Android Settings tab of the configuration, make sure that you select the Enable Push Notification check box.
- The first time you open MicroStrategy Mobile for Android on a device, the user is prompted to allow push notifications for MicroStrategy Mobile. The user must select Allow push notifications.