MicroStrategy ONE
Integrating Microsoft Azure with MicroStrategy Identity
This procedure is performed by an administrator to integrate Microsoft Azure and MicroStrategy Identity.
A Microsoft Azure administrator account (username and password)
Ensure that the user account that you are using to connect is an Azure AD account (for example: admin@test.azure.identity.com) and not a Microsoft account (for example: admin@outlook.com). Additionally, the Azure AD account must have the necessary privileges to configure single sign-on on Azure. If you do not have an account, you can create an Azure AD account from the portal, make the account a 'Global Admin' and finally add this account as an owner to your Azure subscription.
Add your Domain on Azure AD
- In a web browser, log in to Microsoft Azure (https://portal.azure.com/) with an Azure Administrator account.
- Choose Active Directory > Directory and select your Azure AD Directory.
- Choose Domains > Add and enter your domain name.
- Click Next. You will be brought to the verification page.
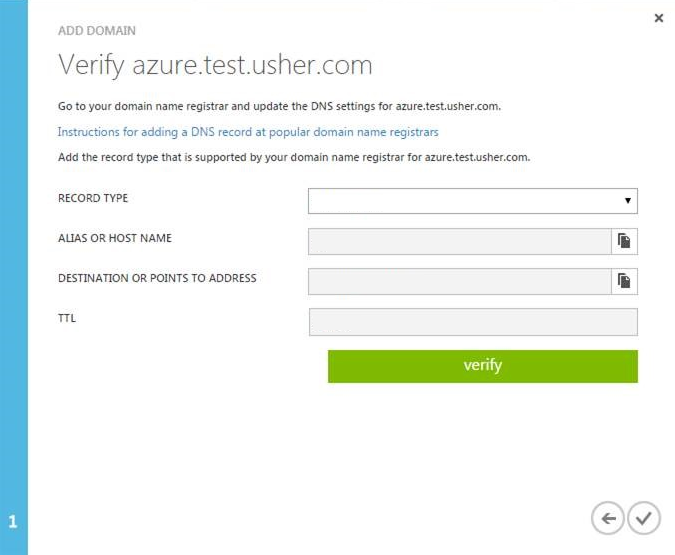
- Enter the TXT record for your domain in your Domain registrar. For Instructions about adding a DNS record at popular registrars, see Create DNS records for Office 365 when you manage your DNS records.
- Verify the DNS record is successfully propagated by using the
nslookupcommand. The following is an example command and output, where Destination or Point to Address =MS=ms93208171:nslookup -q=txt azure.test.usher.com 8.8.8.8Server: 8.8.8.8Address: 8.8.8.8#53Non-authoritative answer:azure.test.usher.com text= "MS=ms93208171" - Click the verify button to complete the verification of your domain.
Install Software on Your Desktop
- Microsoft Online Services Sign-In Assistant for IT Professionals RTW — This application is needed to connect to Azure from the command line.
- Windows Azure Active Directory Module for Windows PowerShell (64-bit version) — This module contains the Powershell cmdlets necessary to configure Azure for federated single sign-on.
Connect to Azure AD
- On your desktop, click the Microsoft Azure Active Directory Module for Windows PowerShell shortcut to open a Windows PowerShell workspace that has the cmdlets.
- Run the following commands. The first command prompts for credentials and stores them as
@msolcred. The second command uses those credentials to connect to the service.$msolcred = get-credentialconnect-msolservice -credential $msolcredIf you receive an error stating that the MSOnline\Microsoft.Online.Administration.Automation.PSModule.dll cannot be loaded because it is built by a runtime newer than the currently loaded runtime, see Azure AD Module — This assembly is built by a runtime newer than the currently loaded runtime and cannot be loaded.
- To set up your organization run as an identity Provider for Azure AD users, download the IdP metadata for Identity Manager. You will need the metadata file to fill some parameters for the Powershell script needed to setup the integration. Follow the comments to customize the script.
The following is an example script. Comments and variables are bold for illustrative purposes:
# Domain name that was verified with Azure$Domain= "azure.test.usher.com"# A description string$Brand= "Usher by MicroStrategy Inc."$ActiveLogonUri= "https://uvs-v2.usher.com/samlecp/912588"# The Location attribute of <md:SingleSignOnService> element from your Usher IdP metadata$PassiveLogonUri= "https://uvs-v2.usher.com/samlsso/912588"# The Location attribute of <md:SingleLogoutService> element from your Usher IdP metadata$LogOffUri= "https://uvs-v2.usher.com/samlslo/912588"# The entityID attribute of <md:EntityDescriptor> element from your Usher IdP metadata$IssuerUri= "https://www.usher.com/912588"# <ds:X509Certificate> from your Usher IdP metadata used for signing SAML assertions$SAMLCert= "MIIESTCCAzGgAwIBAgIJAJ0gYbMGjcK1MA0GCSqGSIb3DQEBBQUAMIG6MQswCQYDVQQGEwJVUzERMA8GA1UECAwIVmlyZ2luaWExFjAUBgNVBAcMDVR5c29ucyBDb3JuZXIxHDAaBgNVBAoME01pY3JvU3RyYXRlZ3ksIEluYy4xHTAbBgNVBAsMFE5ldHdvcmsgQXBwbGljYXRpb25zMRkwFwYDVQQDDBAqLnRlc3QudXNoZXIuY29tMSgwJgYJKoZIhvcNAQkBFhlpbmZyYXN0cnVjdHVyZUB3aXNkb20uY29tMB4XDTE1MDExNDA1MDU0MloXDTE2MDExNDA1MDU0MlowgboxCzAJBgNVBAYTAlVTMREwDwYDVQQIDAhWaXJnaW5pYTEWMBQGA1UEBwwNVHlzb25zIENvcm5lcjEcMBoGA1UECgwTTWljcm9TdHJhdGVneSwgSW5jLjEdMBsGA1UECwwUTmV0d29yayBBcHBsaWNhdGlvbnMxGTAXBgNVBAMMECoudGVzdC51c2hlci5jb20xKDAmBgkqhkiG9w0BCQEWGWluZnJhc3RydWN0dXJlQHdpc2RvbS5jb20wggEiMA0GCSqGSIb3DQEBAQUAA4IBDwAwggEKAoIBAQCm+UvypDCNcbY9r0WPzf133B7CGM/1zrO9XBijcsgXR7z2xY2MoKpNw0b+VngI8dLk4rRmYCXHwG6GqqNFOfG7hMTQbpj5cOyb+I7g76+f/7c/RTgC5msHV7deHNrL/HZr31fAgNqOqNDpYzCDawk0o0I3HLnk2w96uMGx3T+M1ym0+AZp5zTfbTVanXRtXX7KqejY0yBZLmPiCqV3F23nTFqZ9FzLBDwzQgLl9Z21CpMW4hFSJWIHZ4cPkuVOwtggRWD3N7T7uQIfkMHagHEsC/HSO1J80xMC02C4q96uBYIwA0h7WI5YePp6Qmhl6pqrepH9Kfo8sxHaeIhwdsHZAgMBAAGjUDBOMB0GA1UdDgQWBBT3X31U0MMzZ116eQkFfHAei+3lQDAfBgNVHSMEGDAWgBT3X31U0MMzZ116eQkFfHAei+3lQDAMBgNVHRMEBTADAQH/MA0GCSqGSIb3DQEBBQUAA4IBAQA8XKWUXCQfTB1/kr8+rvW/jGQ7HFnxUfVgF2fjrfyfuTTQtf/mfq+BoWvubp2jM85CP2iyRoJ0p5S9dlcV+QvLb94BogCdZsM78ZtbaCpBxLsjLxTGVIcEYC8Po403lcV3mujehzgI0mwY9wTKtGowBNeyAzWwQPoMV8BTpxH60A/wnWGbf0CfBq7O4vIgeXXFYpA1S28jr22/eqea5zN/EFqdegpIWaknxefZbKRCRQIfQrRhqy/26xEDvEpWC9Y9+b/OPhs9gzGsIuvb8nXW+Gqhy9K8/Z63UFn8niFsc6VZi+l0Yrs9Ws2jxEm+fznRVauxmD7j7+XMTXmrhgbB"# Use SAML as the federation protocol$Protocol= "SAMLP"
Set-MsolDomainAuthentication
-DomainName$Domain
-FederationBrandName$Brand
-Authentication Federated
-PassiveLogOnUri$PassiveLogonUri
-ActiveLogOnUri$ActiveLogonUri
-LogOffUri$LogOffUri
-IssuerUri$IssuerUri
-SigningCertificate$SAMLCert
-PreferredAuthenticationProtocol$ProtocolYou might receive an error if any of the URIs in the command above are not HTTPS.
Create an Azure AD Application in MicroStrategy Identity
Your oOrganization is an AD network.
You have synchronized your on premises AD users with Azure AD users using DirSync and mapped the user's attributes follows:
- AD attribute
objectGUIDmapped to Azure AD attributeImmutableID - AD attribute
userPrincipalNamemapped to Azure AD attributeUserPrincipalName
You have imported the two extended AD attributes - objectGUID and userPrincipalName - in MicroStrategy Identity for your AD network users:
- In Identity Manager, open the template for Microsoft Azure.
- Enter a name for your application.
- Click Next.
- Verify that the SAML attribute
IDPEmailis automatically mapped to the User fielduserPrincipalName. - Click Next.
- Click Done.
Create an Azure AD Application in MicroStrategy Identity Using Generic SAML UI
You can setup an application for Azure AD using Generic SAML UI by importing the metadata for Azure AD from here.
Configure using Generic SAML UI such that the preview response shown in the wizard satisfies the following:
- <
NameID> matches theImmutableIDof the user in Azure AD IDPEmailattribute matches theUserPrincipalNameof the user in Azure AD
- Open the Generic SAML wizard and enter a display name for your Azure AD application.
- Select Upload Metadata from URL, enter https://nexus.microsoftonline-p.com/federationmetadata/saml20/federationmetadata.xml, and click Next.
- For Default NameID Format, select persistent.
- For Mapped Identity Attribute for Unspecified NameID Format, select an attribute that maps to the
ImmutableIDfield in Azure AD for a user. The specifics of your user provisioning determines the attribute that you must choose. - In the "Attribute Consuming Service dialog," add a new SAML attribute IDPEmail and select an attribute that maps to
UserPrincipalNamein Azure AD for a user. The specifics of your user provisioning determines the attribute that you must choose. - Click Next.
- Click Done.
Verify SAML Single Sign-On
- Open a web browser and go to the Azure Portal (https://portal.azure.com) or any Microsoft Online service for your organization, such as Office 365.
- Enter the username for the user you want to login as. If the setup was successful, you are redirected to the QR code scan page.
- Open the MicroStrategy Badge app and scan the displayed QR code.
After Microsoft Azure has been integrated with MicroStrategy Identity, users can configure their Office 365 applications to sign in using the MicroStrategy Badge app.