MicroStrategy ONE
Creating a Transaction Services Report
When using the Freeform SQL Editor to create a Transaction Services report, you can use SQL or XQuery to define the data that needs to be updated:
- SQL is used to update the data stored in databases. Creating SQL as part of a Freeform SQL report is described in Customize Your SQL Statements: Freeform SQL.
- XQuery is used to report on third-party web services. Creating XQuery as part of a Freeform SQL report is described in Reporting on Third-Party Web Services with XQuery.
In addition to writing the SQL or XQuery statement, you must also define which parts of the statement are used to update values in the data source. The steps below show you how to create a Transaction Services report using the Freeform SQL Editor.
The MicroStrategy Tutorial project includes examples of Transaction Services. These examples include all the reports, documents, and other objects and configurations that are required to use Transaction Services. You can review these Transaction Services example in the following MicroStrategy Tutorial project location: MicroStrategy Tutorial\Public Objects\Reports\MicroStrategy Platform Capabilities\MicroStrategy Transaction Services. High-level steps are provided to explain the creation of the example Transaction Services document Item Order form, see Transaction Services Example: Item Order Form.
A license for Transaction Services is required to create a Transaction Services report.
Access to the Freeform SQL Editor to create a Transaction Services report is available only to Developers with the Define Freeform SQL Report, Create Transaction Report, and Create Schema Objects privileges.
To Create a Transaction Services Report
- In MicroStrategy Developer, choose File > New > Report.
- On the Freeform Sources tab, select Create Transaction report.
- In the Source area, select the database instance for the data source to be updated using Transaction Services.
- Click OK.
- Enter the XQuery statement required to connect to the third-party web service or data source in the SQL Statement pane if you are using XQuery to connect to and update data.
Creating this part of an XQuery is described as part of the Connecting to a web service and requesting data step within Using XQuery to Retrieve Data from a Web Service.
If you are using SQL to connect to and update data, this step is not required.
- Right-click within the SQL Statement pane and select Insert Transaction.
If you included XQuery syntax as part of the previous steps, you should place the cursor at the end of the XQuery syntax when performing this action.
- To determine whether all records of the table that are updated by the transaction are inserted:
- Select the Insert only distinct records check box to only insert distinct records.
This behavior is intended for using Transaction Services to update lookup tables that store attribute information, such as customer information.
- Clear the Insert only distinct records check box to insert all records.
By default, this check box is cleared. This behavior is intended for using Transaction Services to update fact tables that store fact data, such as revenue and profit.
- Select the Insert only distinct records check box to only insert distinct records.
- Click OK.
- Enter the statement between the
Begin TransactionandEnd Transactionplaceholders to update values for your data source.An input object must be defined for each column of data that is to be updated or is used to distinguish each record. Defining input objects is included as a task later in this procedure. While typing the statement, you can leave the input objects for each column of data blank in the statement.
The SQL statement below updates the columns
TOT_DOLLAR_SALES,TOT_UNIT_SALES, andTOT_COSTof theCITY_CTR_SLStable. Blanks are left after each equals (=) sign.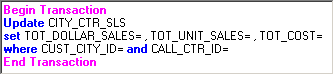
The
CUST_CITY_IDandCALL_CTR_IDcolumns are included in the query so that each record in the table can be distinguished when updating the values.The statement below shows an example of an XQuery statement that updates the records
Amount,Date, andCommentsof theTable1table. Blanks are left for each of the XML tags.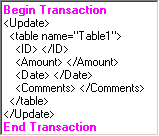
The
IDrecord is included in the query so that each record in the table can be distinguished when updating the values.
To Define the Input Objects for a Transaction
- You must define the input objects, which provide a link between the data that is updated by a transaction and the object that users interact with to update the data. To define the input objects:
- Within the statement, place the cursor where the input object needs to be included so that it can define the data for a column.
- If you are using a SQL statement, it is common to include the input object after an equals sign (
=) for a column. - If you are using an XQuery statement, it is common to include the input object within an XML tag for a given record.
- If you are using a SQL statement, it is common to include the input object after an equals sign (
- Once the cursor is placed appropriately, right-click, point to Define New Input, and then select one of the following:
- Attribute form: Select this option to map the statement text and its associated data to an attribute. For example, the
CUST_CITY_IDandCALL_CTR_IDcolumns of the example SQL statement must be mapped to attribute forms. A new attribute form is created in the Input Objects tab. - Metric: Select this option to map the statement text and its associated data to a metric. For example, the
TOT_DOLLAR_SALES,TOT_UNIT_SALES, andTOT_COSTcolumns of the example SQL statement must be mapped to metrics. A new metric is created in the Input Objects tab. - You must map the new input object to an attribute form or metric:
- To create a new attribute or metric for the input object, in the Object column, type a name.
- To select an existing attribute form or metric to map to the input object, right-click the row for the input object and select Replace. The Select an Object dialog box opens. Select the object that you want to use and click OK.
If the input object is an attribute form, you can map it to the attribute form of a project attribute. This provides a logical connection between the input object and the attribute in your project.
If the input object is a metric, you must map it to a new or existing managed object. Attribute form input objects can also be mapped to managed objects.
Once a name is given to the input object, this name is reflected in the statement. Each input object is enclosed with square brackets (
[]) within the statement. For example, the SQL statement shown below has input objects defined for each column of data that is to be updated or is used to distinguish each record.
- If the input object is an attribute form, in the Form column, select the attribute form for the input object. For each attribute that you define as an input object, you must map the ID form to an input object. Mapping additional attribute forms to input objects is optional.
- In the Required column, select one of the following:
- No: Defines the input object as optional for a transaction. The input object is only included in a transaction if a user selects to update its value. If you define an input object as optional, make sure that the syntax of your statement would be accurate if the input object is not included in a transaction.
With the new input object selected in the Input Objects tab, select the text of the statement that is dependent on the input object. With the text selected, right-click and select Input-dependent Text. For example, using the SQL statement example mentioned previously, selectTOT_DOLLAR_SALES=[Revenue], to define the first input. Examples of how to create valid statement syntax with optional input objects are provided in Defining Input-Dependent SQL or XQuery Syntax. - Yes: Defines the input object as required for a transaction. You must define any input object that is used to distinguish the record updated using a transaction as required. For the example SQL statement provided, the input objects for
CUST_CITY_IDandCALL_CTR_IDmust be defined as required for the transaction.
Repeat the steps To Define the Input Objects for a Transaction to create input objects for each column of data that is to be updated or is used to distinguish each record in your transaction statement.
To Create an Output Object
- On the Output Objects tab, right-click and select Add New Metric.
This output object does not display any values, but it is required to create a Transaction Services report.
- Enter a name for the metric.
To Complete and Save the Transaction Services Report
- Click OK.
If any dialog boxes are displayed which require you to determine which object to use for an attribute or metric, select the appropriate object. Remember that attributes can be mapped to either project or managed objects, but metrics can only be mapped to managed objects.
- Click Save and Close.
- Enter a name for the report and click Save.
Once you have created a Transaction Services report, use MicroStrategy Web to create Report Services documents, which can use the Transaction Services report to allow users to update values. This can include interactive documents and dashboards, which can be viewed using MicroStrategy Web as well as MicroStrategy Mobile.
For details on how to create a document that can use a Transaction Services report, see the MicroStrategy Web Help. An example of the steps required to create the final Report Services document is also provided in Transaction Services Example: Item Order Form.
Defining Input-Dependent SQL or XQuery Syntax
While creating a SQL or XQuery statement for a Transaction Services report, you must define which parts of the statement are dependent on an input. When a transaction is requested, the inputs are included in the SQL or XQuery statement to update the values in the data source.
When creating a Transaction Services report, you can make some of the inputs optional. This supports the scenario that a user only wants to update values for certain metrics or attributes, while leaving the other objects with their current data.
You can define parts of the SQL or XQuery syntax as input dependent as described below:
The information below only describes the logic of how to determine which parts of the SQL or XQuery syntax to define as input dependent. For steps to define syntax as input dependent, see Creating a Transaction Services Report.
- If the input is optional, you must define all parts of the syntax that should be removed if a new value is not provided for the input:
-
When using SQL, this can mean including commas and other SQL syntax as dependent on an input. For example, the following SQL statement can be used to update three columns of data:
Update CITY_CTR_SLSset TOT_DOLLAR_SALES=[Revenue],
TOT_UNIT_SALES=[Units Sold], TOT_COST=[Cost]
where CUST_CITY_ID=[Customer City@ID] and
CALL_CTR_ID=[Call Center@ID]
TOT_DOLLAR_SALES=[Revenue],The entire syntax listed above, including the comma, is mapped to a Revenue metric as an input, which is defined as an optional input.
TOT_UNIT_SALES=[Units Sold],The entire syntax listed above, including the comma, is mapped to a Units Sold metric as an input, which is defined as an optional input.
TOT_COST=[Cost]The entire syntax listed above is mapped to a Cost metric as an input, which is defined as a required input.
Mapping the syntax in this way ensures that the syntax is removed from the statement if the input objects associated with
TOT_DOLLAR_SALESandTOT_UNIT_SALESare not included in the transaction.- When using XQuery, this can mean including the entire line that requests a certain record as dependent on an input. For example, the following XQuery statement can be used to update three columns of data:
<Update>
<table name="Table1">
<ID>[ID@ID]</ID>
<Amount>[Amount]</Amount>
<Date>[Date@ID]</Date>
<Comments>[Comments@DESC]</Comments>
</table>
</Update>
The records
Amount,Date, andCommentscan all be defined as optional. This means the following sections of syntax need to be mapped to inputs:<Amount>[Amount]</Amount>The entire syntax listed above, including the Amount tags, is mapped to an Amount metric as an input, which is defined as an optional input.
<Date>[Date@ID]</Date>The entire syntax listed above, including the Date tags, is mapped to a Date attribute as an input, which is defined as an optional input.
<Comments>[Comments@DESC]</Comments>
The entire syntax listed above, including the Comments tags, is mapped to a Comments attribute as an input, which is defined as an optional input.
Mapping the syntax in this way ensures that the associated syntax is removed from the statement if the input objects associated with
Amount,Date, andCommentsare not included in the transaction.
- When using XQuery, this can mean including the entire line that requests a certain record as dependent on an input. For example, the following XQuery statement can be used to update three columns of data:
- If the input is required, you can define just the input parameter of the syntax that is used to update the required input. This is done automatically when defining a new input object. For example, the following SQL statement can be used to update three columns of data:
Update CITY_CTR_SLSset TOT_DOLLAR_SALES=[Revenue],
TOT_UNIT_SALES=[Units Sold], TOT_COST=[Cost]
where CUST_CITY_ID=[Customer City@ID] and
CALL_CTR_ID=[Call Center@ID]
The columns
CUST_CITY_IDandCALL_CTR_IDare required to make sure the proper record is updated with the transaction. This means the following sections of syntax need to be mapped to inputs:[Customer City@ID]The entire syntax listed above is mapped to a Customer City attribute as an input, which is defined as a required input.
[Call Center@ID]The entire syntax listed above is mapped to a Call Center attribute as an input, which is defined as a required input.
Since the inputs are required, a value is always provided for
CUST_CITY_ID=andCALL_CTR_ID=, which ensures that the syntax is valid.For an example of a required input for an XQuery statement, the following XQuery statement can be used to update three columns of data:
<Update>
<table name="Table1">
<ID>[ID@ID]</ID>
<Amount>[Amount]</Amount>
<Date>[Date@ID]</Date>
<Comments>[Comments@DESC]</Comments>
</table>
</Update>
The record
IDis required to make sure the proper record is updated with the transaction. This means this record must be mapped to required input objects, using the following syntax:[ID@ID]
The entire syntax listed above is mapped to an ID attribute as an input, which is defined as a required input.
The columns TOT_DOLLAR_SALES, TOT_UNIT_SALES, and TOT_COST can all be defined as optional. However, to ensure that the SQL statement can be valid, at least one of the columns must be required. For this example, the TOT_COST column is mapped to a required input. This means the following sections of syntax need to be mapped to inputs:
Transaction Services Example: Item Order Form
The MicroStrategy Tutorial project includes examples of Transaction Services in the location: MicroStrategy Tutorial\Public Objects\Reports\MicroStrategy Platform Capabilities\MicroStrategy Transaction Services.
Included in these examples is the Item Order Form document. This document is an example of using Transaction Services to review the current inventory of items and place an order for items to replenish that inventory as needed. As part of the transaction, you can request a new order, including the quantity of the item and whether the order is high priority. You can also use the same document to update your orders before they are fully processed, for example, providing a new delivery date or changing a priority flag. The Item Order Form is shown below.
![]()
The steps below provide a high-level overview of how this example document was created. The steps focus on the configurations most closely associated with configuring Transaction Services. Detailed steps to create the supporting objects such as metrics, attributes, and so on are not provided, but you can review their definitions in the Tutorial project.
To Create a Transaction Services Item Order Form
- In MicroStrategy Developer, log in to the MicroStrategy Tutorial project.
To Create the Transaction Services Reports
The Item Order Form document uses two different Transaction Services reports, one to insert new orders (Insert Item Order) and a second to update any existing order (Update Item Order).
- Choose File > New > Report.
- Select Create Transaction report from the Freeform Sources tab. Select the Operational Datamart as the source, as this example creates the data in this data source.
- Click OK.
- Right-click within the SQL Statement pane. Select Insert Transaction.
- Click OK.
- Enter the following statement between the
Begin TransactionandEnd Transactionplaceholders:INSERT INTO F_INVENTORY_ORDERSVALUES(, , , , , , , , 1, )This statement will insert a new record into the
F_INVENTORY_ORDERStable, which has nine columns of data. The value 1 indicates that the data is a new order that has been inserted; the other eight columns must be connected to attributes and metrics to provide their values. - Define the input objects for the transaction report. You accomplish this by putting the cursor just before each comma in the statement provided above, then right-click and point to Define New Input. The first six you must define as new attribute forms, the last three are defined as metrics. For each attribute form or metric you can create a new attribute form or metric as required. This creates the syntax for the transaction statement as well as creates the input object, as shown below:
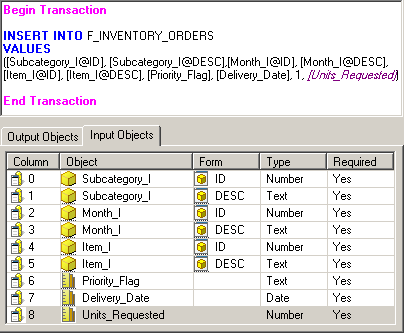
All of these input objects are defined as required.
- From the Output Objects tab, map the Output attribute's ID form as the one output object.
- Click OK.
- Click Save and Close. Name the Transaction Services report as Insert Item Order. This completes the creation of the Transaction Services report to insert new orders.
- Choose File > New > Report.
- Select Create Transaction report from the Freeform Sources tab. Select the Operational Datamart as the source, as this example creates the data in this data source.
- Click OK.
- Right-click within the SQL Statement pane. Select Insert Transaction.
- Click OK .
- Enter the following statement between the
Begin TransactionandEnd Transactionplaceholders:UPDATE F_INVENTORY_ORDERSSETDELIVERY_DATE = ,PRIORITY_FLAG = ,UNITS_REQUESTED =WHEREMONTH_KEY =AND ITEM_KEY =This statement will update records in the
F_INVENTORY_ORDERStable. - Define the input objects for the transaction report. You accomplish this by putting the cursor just after each equal sign (
=) in the statement provided above, then right-click and point to Define New Input. TheMONTH_KEYandITEM_KEYare defined as attribute forms, and theDELIVERY_DATE,PRIORITY_FLAG, andUNITS_REQUESTEDare defined as metrics. This creates the syntax for the transaction statement as well as creates the input objects, as shown below: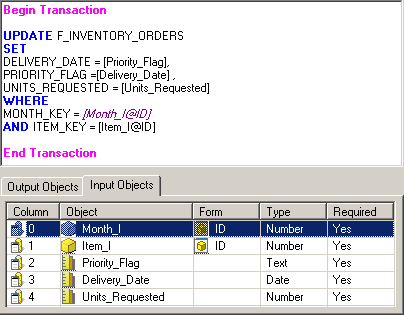
Notice that all of these input objects are defined as required.
- From the Output Objects tab, map the Output attribute's ID form as the one output object.
- Click OK.
- From the toolbar, click Save and Close. Name the Transaction Services report as Update Item Order.
To Create the Reports to Display Data on Your Document
The Item Order Form document uses two reports as datasets to display the data. These reports are provided in the Tutorial project as Report Item Orders and Revenue and Units Sold by Subcategory.
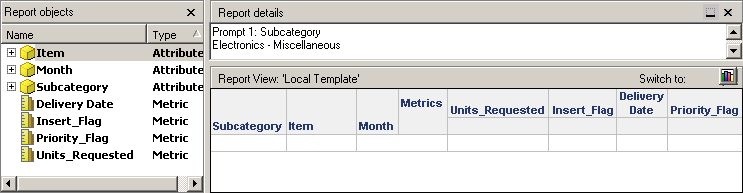
- Create the Report Item Orders report, which serves to include the objects from the Transaction Services reports on the document. The general definition of this report is shown below:
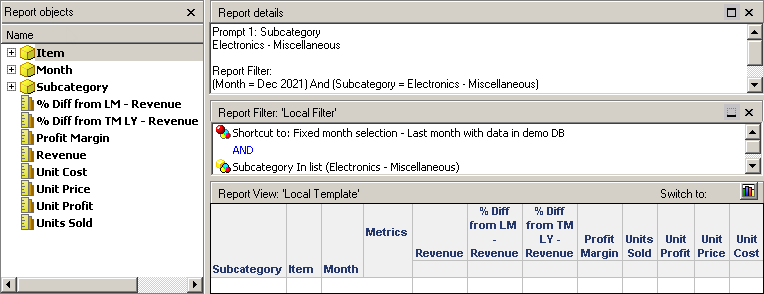
- Create the Revenue and Units Sold by Subcategory report, which serves to include additional data on the document. The general definition of this report is shown below:
To Create the Item Order Form Document
- In MicroStrategy Web, log in to the Tutorial project.
- Click the MicroStrategy icon, and select Create Document.
- From the list of document templates, click Blank Document.
- Click within the Dataset Objects area to add datasets for the document. Add the two reports Report Item Orders and Revenue and Units Sold by Subcategory as datasets of the document.
- Create and format the document. The general structure of the document is shown below.

You can also access the Item Order Form document in the Tutorial project to review each component of the document, and refer to the Report Services Document Creation Guide for steps to create a document. For the purposes of this example, only the parts related to support Transaction Services are explained below.
- This document uses panel stacks to support each transaction. The Insert, Update, and Incorrect sections shown below are each a separate panel stack for the document.

You must create these separate panel stacks and then include the objects as shown below on each panel stack. For best practices on creating panel stacks, see the Dashboards and Widgets Creation Guide.
- Once you have created each panel stack, you must define the transaction that is performed for each panel stack, as described below:
- Insert panel stack: This panel stack supports the ability to insert new item orders. Right-click within the panel stack and select Configure Transaction. The Configure Transaction dialog box opens. Since this panel stack is inserting new orders, in the Transaction Report field, browse to and select the Insert Item Order report you created earlier in these steps. This displays all the input objects available for the Insert Item Order report. You must then define which of these input objects performs the transaction. These definitions are shown below:

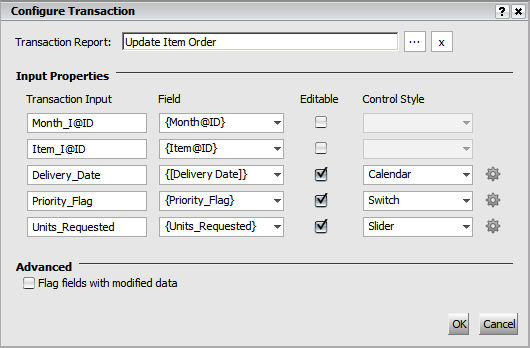
- Update panel stack: This panel stack supports the ability to update item orders. Right-click within the panel stack and select Configure Transaction. The Configure Transaction dialog box opens. Since this panel stack is updating existing orders, in the Transaction Report field, browse to and select the Update Item Order report you created earlier in these steps. This displays all the input objects available for the Update Item Order report. You must then define which of these input objects performs the transaction. These definitions are shown below:
- Incorrect panel stack: This panel stack supports the ability to update item orders that have been marked as incorrect. Right-click within the panel stack and select Configure Transaction. The Configure Transaction dialog box opens. Since this panel stack is updating existing orders, in the Transaction Report field, browse to and select the Update Item Order report you created earlier in these steps. This displays all the input objects available for the Update Item Order report. You must then define which of these input objects performs the transaction. You can use the same definitions that were used for the update panel stack described above.
- With all the transactions defined, you must include a selector on the document that lets users submit their changes. In the example, this is handled with the Submit button highlighted below:

To create this selector, from the Insert menu, point to Selector, and then select Action Selector Button. Within the Subcategory Header section, click and drag the area for the new button. The new selector is created.
- Right-click the new selector and select Properties and Formatting. The Properties and Formatting dialog box opens.
- Underneath Properties, click the Selector category. This is where you define how the transaction is submitted, as described below:
- In the Action Type drop-down list, select Submit.
- Select the Display message after submitting check box, and then type a message that is displayed as a confirmation to the person who submits a transaction.
- Select the Invalidate mobile device cache check box. This ensures that if the document is viewed using MicroStrategy Mobile that the updated data can be retrieved.
- In the Targets area, move the three panel stacks you created earlier to the Selected pane.
All other defaults can be kept.
- Click Apply and then click OK.
With this document created, analysts can now view this document in MicroStrategy Web using Express mode. While viewing the document, they can submit item orders.