MicroStrategy ONE
Connect to Shopify Using JDBC
Connecting to Shopify using JDBC is only supported on MicroStrategy ONE Update 11 or earlier. If you are using MicroStrategy ONE Update 12 or later, see Connect to Shopify Using ODBC.
Shopify is an e-commerce platform for online stores and retail point-of-sale, which takes care of digital receipts, inventory and sales reports, and provides valuable analytics and feedback. MicroStrategy ships the Shopify JDBC connector for customer to connect Shopify as data source when doing data import on Web and Workstation.
The Shopify JDBC driver supports standard SQL-92 syntax and functions but limited in write back and performance. MicroStrategy will support in-memory data import and choose to process data on our side.
- Data Retrieve Mode: JDBC Call Only
- Data Import supported: Select Tables, Free Form SQL, Query Builder (In-memory)+
JDBC Connection URL
MicroStrategy ships the Shopify JDBC driver to connect Shopify as a data source using the Access Token method. You can find it on the data source dialog when doing data import.
Using Access Token method
jdbc:Shopify://;HOST=[Host]; Auth_Type=OAuth 2.0;Auth_AccessToken=[Access_Token];
Shopify has a rate limit of 2 requests per second.
JDBC Schema Tables
Shopify stores data in structures which do not follow the rules of data typing and structure that apply to traditional relational tables and columns. The JDBC drivers use schema tables to map the Shopify data. The mapping method is complicated, so lower performance is expected when querying tables with large amounts of data.
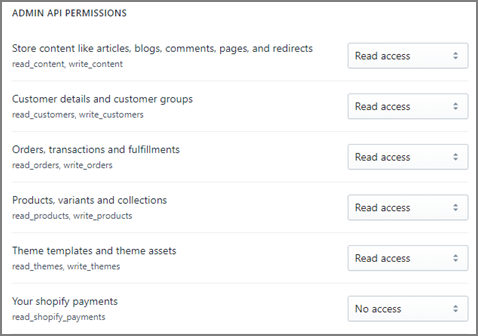
Changing Table Permissions
You can change permissions of tables through your Shopify store account. You can set these permissions while creating a new private app or change them any time after the app has been created.
- Click Apps > Manage private apps and select your app from the list.
- Apply your changes in the ADMIN API PERMISSIONS module.
Configure Shopify using JDBC on Web and Workstation
- Workstation
- Web
See Create and Edit Data Sources for steps to create a new data source and connection.
Accessing the Connector in MicroStrategy
- Choose Add Data
 > New Data.
 - Find the Shopify connector in the data source list.
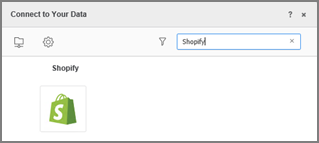
- Click the connector.
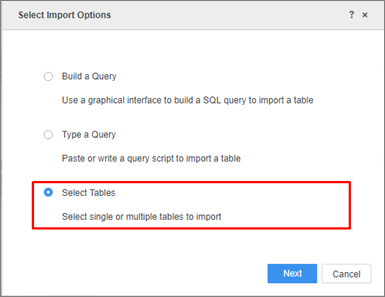
Using the Shopify Connector to Import Data
- Choose Select Tables, Type a Query, or Build a Query to import data.
It is recommended to use Select Tables to reduce joins on the driver side for best performance.
- In the Data Source interface, select DSN-less Data Source and choose Shopify for both Database and Version. Use one of the following methods to configure the DSN-less connection:
- Access Token: Enter the required Host Name, Access Token, User, Password, and Data Source Name fields.
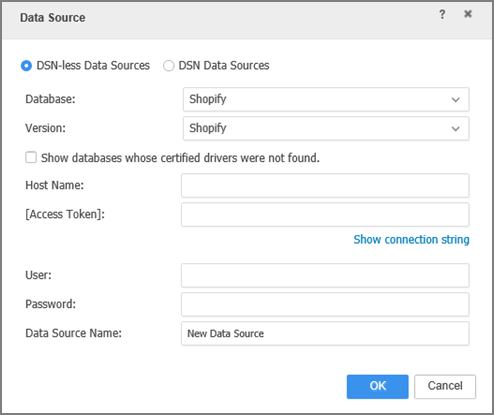
- Edit the Connection String: Click Show connection string and select Edit connection string. Enter the connection information of the JDBC connection string.
Ignore Driver. Type any character in the User and Password fields, as they will not be used in the connection.

- Access Token: Enter the required Host Name, Access Token, User, Password, and Data Source Name fields.
- Click OK.
- Click on the new Data Source to connect.
In-Memory Data Import
After creating and connecting to the Shopify data source, you can retrieve data through JDBC and then publish a cube for dashboards, reports, and documents.
The examples below are using the Select Tables import option.
- Click your Shopify data source and select the tables you want to import.
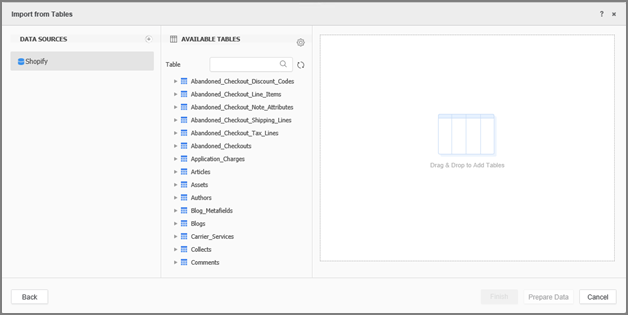
- Click Prepare Data.
- Click Finish.
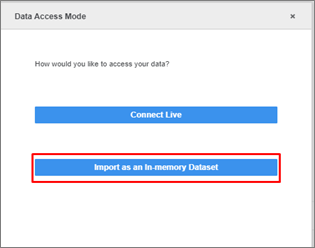
- Select Import as an In-memory Dataset Mode to publish a cube.
How to Get Credentials for Shopify
- Create a Shopify store.
- Log into your Shopify store.
- Click Apps > Manage private apps.
- Create a private app in Apps module. The credentials will be available in the Admin API module in your private app dashboard.
The Access Token is referred to as Password in Shopify, and can be found in Admin API module. The Storefront API is not supported by the driver and the "Storefront access token" should be ignored.
