MicroStrategy ONE
Restricting Access to Data: Security Filters
Security filters enable you to control what warehouse data users can see when that data is accessed through MicroStrategy. A security filter can be assigned to a user or group to narrow the result set when they execute reports or browse elements. The security filter applies to all reports and documents, and all attribute element requests, submitted by a user.
For example, two regional managers can have two different security filters assigned to them for their regions: one has a security filter assigned to them that only shows the data from the Northeast region, and the other has a security filter that only shows data from the Southwest region. If these two regional managers run the same report, they may see different report results.
Security filters serve a similar function to database-level techniques such as database views and row level security. For information about controlling data security at the data warehouse level, see Controlling Access to Data at the Database (RDBMS) Level.
For more information about security filters, see the following:
- Security Filter Example
- How Security Filters Work
- Creating and Applying a Security Filter
- Security Filters and Metric Levels
- Using a Single Security Filter for Multiple Users: System Prompts
- Merging Security Filters
Security Filter Example
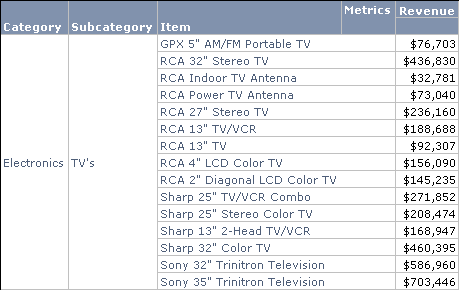
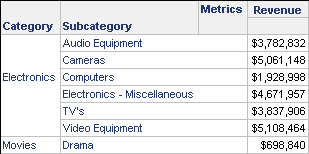
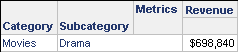
A user in the MicroStrategy Tutorial project has a security filter defined as Subcategory=TV. When this user browses the Product hierarchy beginning with the Category attribute, they only see the Electronics category. Within the Electronics category, they see only the TV subcategory. Within the TV subcategory, they see all Items within that subcategory.
When this user executes a simple report with Category, Subcategory, and Item in the rows, and Revenue in the columns, only the Items from the TV Subcategory are returned, as shown in the example below.
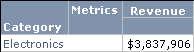
If this user executes another report with Category in the rows and Revenue in the columns, only the Revenue from the TV Subcategory is returned, as shown in the example below. The user cannot see any data from attribute elements that are outside the security filter.
How Security Filters Work
Security filters are the same as regular filters except that they can contain only attribute qualifications, custom expressions, and joint element lists. Relationship filters and metric qualifications are not allowed in a security filter. A security filter can include as many expressions as you need, joined together by logical operators. For more information on creating filters, see the Filters section in the Basic Reporting Help.
A security filter comes into play when a user is executing reports and browsing elements. The qualification defined by the security filter is used in the WHERE clause for any report that is related to the security filter's attribute. By default, this is also true for element browsing: when a user browses through a hierarchy to answer a prompt, they only see the attribute elements that the security filter allows them to see. For instructions on how to disable security filters for element browsing, see To Disable Security Filters for Element Browsing.
Security filters are used as part of the cache key for report caching and element caching. This means that users with different security filters cannot access the same cached results, preserving data security. For more information about caching, see Improving Response Time: Caching.
Each user or group can be directly assigned only one security filter for a project. Users and groups can be assigned different security filters for different projects. In cases where a user inherits one or more security filters from any groups that they belong to, the security filters may need to be merged. For information about how security filters are merged, see Merging Security Filters.
Creating and Applying a Security Filter
You create and apply security filters in the Security Filter Manager. Make sure you inform your users of any security filters assigned to them or their group. If you do not inform them of their security filters, they may not know that the data they see in their reports has been filtered, which may cause misinterpretation of report results.
To create security filters, you must have the following privileges:
- Create Application Objects (under the Common Privileges privilege group)
- Use Report Filter Editor (under the Developer privilege group)
- Use Security Filter Manager (under the Administration privilege group)
- To create and apply a security filter for a user or group
- In Developer, from the Administration menu, go to Projects > Security Filter Manager.
- From the Choose a project drop-down list, select the project that you want to create a security filter for.
- Select the Security Filters tab.
- Select one:
- To create a new security filter, click New. The Security Filter Editor opens.
- OR, to convert an existing filter into a security filter, click Import. Browse to the filter you want to convert and click Open. Specify a name and location for the new security filter and click Save.
- In the left side of the Security Filter Manager, in the Security Filters tab, browse to the security filter that you want to apply, and select that security filter.
- In the right side of the Security Filter Manager, select Security Filters.
- Browse to the user or group that you want to apply the security filter to, and select that user or group.
- Click > to apply the selected security filter to the selected user or group.
- Click OK.
To Disable Security Filters for Element Browsing
- In Developer, log into a project. You must log in with a user account that has administrative privileges.
- From the Administration menu, point to Projects, and then select Project Configuration.
- Expand the Project Definition category, and then select Advanced.
- Under Attribute element browsing, clear the Apply security filters to element browsing check box.
- Click OK.
- Restart Intelligence Server for your changes to take effect.
Security Filters and Metric Levels
In certain situations involving level metrics, users may be able to see a limited amount of data from outside their security filter. Specifically, if a metric is defined with absolute filtering on a level above that used in the security filter's expression, the filter expression is raised to the metric's level. For information about metric levels and filtering in metrics, see the Metrics section in the Advanced Reporting Help.
For example, consider a metric called Category Revenue that is defined to return the revenue across all items in each category. Its level expression is Target=Category, Filtering=Absolute. When a user with a security filter Subcategory=TV executes a report with the Category Revenue metric, the Category Revenue metric displays the total revenue for the category. The user's security filter is effectively changed to show the entire Category in which TV is a Subcategory.
This behavior can be modified by using the top range attribute and bottom range attribute properties.
- A top range attribute specifies the highest level of detail in a given hierarchy that the security filter allows the user to view. If a top range attribute is specified, the security filter expression is not raised to any level above the top range.
- A bottom range attribute specifies the lowest level of detail in a given hierarchy that the security filter allows the user to view. If this is not specified, the security filter can view every level lower than the specified top range attribute, as long as it is within the qualification defined by the filter expression.
The top and bottom range attributes can be set to the same level.
For instructions on how to assign range attributes to security filters, see Assigning a Top or Bottom Range Attribute to a Security Filter.
The examples below use a report with Category, Subcategory, and Item on the rows, and three metrics in the columns:
- Revenue
- Subcategory Revenue, which is defined with absolute filtering to the Subcategory level
- Category Revenue, which is defined with absolute filtering to the Category level
The user executing this report has a security filter that restricts the Subcategory to the TV element.
No Top or Bottom Range Attribute
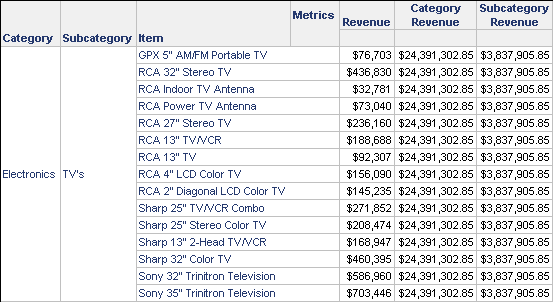
If no top or bottom range attribute is specified, then at the level of the security filter (Subcategory) and below, the user cannot see data outside their security filter. Above the level of the security filter, the user can see data outside the security filter if it is in a metric with absolute filtering for that level. Even in this case, the user sees only data for the Category in which their security filter is defined.
In the example report below, the user's security filter does not specify a top or bottom range attribute. Item-level detail is displayed for only the items within the TV category. The Subcategory Revenue is displayed for all items within the TV subcategory. The Category Revenue is displayed for all items in the Category, including items that are not part of the TV subcategory. However, only the Electronics category is displayed. This illustrates how the security filter Subcategory=TV is raised to the category level such that Category=Electronics is the filter used with Category Revenue.
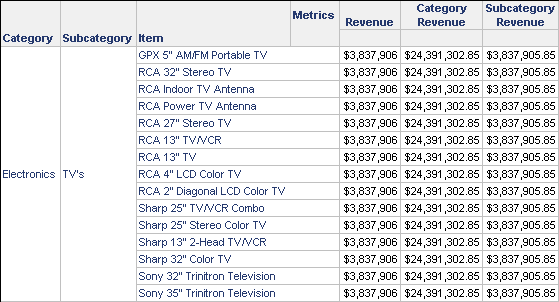
Top Range Attribute: Subcategory
If a top range attribute is specified, then the user cannot see any data outside of them security filter. This is true even at levels above the top level, regardless of whether metrics with absolute filtering are used.
In the example report below, the user's security filter specifies a top range attribute of Subcategory. Here, the Category Revenue is displayed for only the items within the TV subcategory. The security filter Subcategory=TV is not raised to the Category level, because Category is above the specified top level of Subcategory.

Bottom Range Attribute: Subcategory
If a bottom range attribute is specified, the user cannot see data aggregated at a lower level than the bottom level.
In the example report below, the user's security filter specifies a bottom range attribute of Subcategory. Item-level detail is not displayed, because Item is a level below the bottom level of Subcategory. Instead, data for the entire Subcategory is shown for each item. Data at the Subcategory level is essentially the lowest level of granularity the user is allowed to see.
Assigning a Top or Bottom Range Attribute to a Security Filter
You assign top and bottom range attributes to security filters in the Security Filter Manager. You can assign range attributes to a security filter for all users, or to the security filters per user.
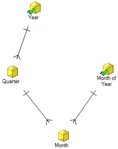
You can assign the same attribute to a security filter as a top and bottom range attribute. A security filter can have multiple top or bottom range attributes as long as they are from different hierarchies. You cannot assign multiple attributes from the same hierarchy to either a top or bottom range. However, you can assign attributes from the same hierarchy if one is a top range attribute and one is a bottom range attribute. For example, you can assign Quarter (from the Time hierarchy) and Subcategory (from the Products hierarchy) as top range attributes, and Month (from the Time hierarchy) and Subcategory as bottom range attributes.
To modify security filters, you must have the Use Security Filter Manager privilege.
To Assign a Top or Bottom Range Attribute to a Security Filter
- In Developer, from the Administration menu, point to Projects and then select Security Filter Manager.
- From the Choose a project drop-down list, select the project that you want to modify security filters for.
- Select the Attributes tab.
- Browse to the attribute that you want to set as a top or bottom range attribute, and select that attribute.
- To apply a top or bottom range attribute to a security filter for all users:
- In the right side of the Security Filter Manager, select Security Filters.
- Browse to the security filter that you want to apply the range attribute to.
- Expand that security filter, and select either the Top range attributes or Bottom range attributes folder.
- Click > to apply the selected attribute to the selected security filter.
- To apply a top or bottom range attribute to a security filter for a single user or group:
- In the right side of the Security Filter Manager, select Groups/Users.
- Browse to the user or group that you want to apply the range attribute to.
- Expand that user or group and select the security filter that you want to apply the range attribute to.
- Expand that security filter, and select either the Top range attributes or Bottom range attributes folder.
- Click > to apply the selected attribute to the selected security filter for the selected user or group.
- Click OK.
Merging Security Filters
A user can be assigned a security filter directly, and can inherit a security filter from any groups that they belong to. Because of this, multiple security filters may need to be merged when executing reports or browsing elements.
MicroStrategy supports the following methods of merging security filters:
- Merging Related Security Filters with OR and Unrelated Security Filters with AND (This is the default method for merging security filters)
- Merging All Security Filters with AND
For the examples in these sections, consider a project with the following user groups and associated security filters:
|
Group |
Security Filter |
Hierarchy |
|
Electronics |
Category = Electronics |
Product |
|
Drama |
Subcategory = Drama |
Product |
|
Movies |
Category = Movies |
Product |
|
Northeast |
Region = Northeast |
Geography |
You control how security filters are merged at the project level. You can change the merge settings in the Project Configuration Editor for the selected project, in the Security Filter category. After making any changes to the security filter settings, you must restart Intelligence Server for those changes to take effect.
Changing how security filters are merged does not automatically invalidate any result caches created for users who have multiple security filters. MicroStrategy recommends that you invalidate all result caches in a project after changing how security filters are merged for that project. For instructions on how to invalidate all result caches in a project, see Managing Result Caches.
Merging Related Security Filters with OR and Unrelated Security Filters with AND
By default, security filters are merged with an OR if they are related, and with an AND if they are not related. That is, if two security filters are related, the user can see all data available from either security filter. However, if the security filters are not related, the user can see only the data available in both security filters.
Two security filters are considered related if the attributes that they derive from belong in the same hierarchy, such as Country and Region, or Year and Month. In the example security filters given above, the Electronics, TV, and Movies security filters are all related, and the Northeast security filter is not related to any of the others.
Using this merge method, a user who is a member of both the Electronics and Drama groups can see data from the Electronics category and the Drama subcategory, as shown below:
A user who is a member of both the Movies and Drama groups can see data from all subcategories in the Movies category, not just the Drama subcategory. A user who is a member of both the Electronics and Drama categories can see data from both categories.
If a user who is a member of the Movies and Northeast groups executes a report with Region, Category, and Subcategory in the rows, only data from the Movies category in the Northeast region is shown, as seen below:
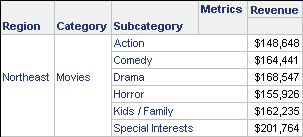
Data for the Movies category from outside the Northeast region is not available to this user, nor is data for the Northeast region for other categories.
The following examples show how the data engine treats related and unrelated attributes.
Related Attributes
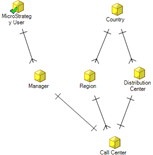
Two security filters are considered related if the attributes that they derived from belong in the same hierarchy with a one-to-one or one-to-many relation, such as Manager and Call Center, Country and Region, or Year and Month.
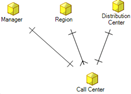
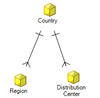
There are some advanced cases that fall into related or unrelated categories. Related cases are sibling relations with a one-to-many relationship to a common child/parent attribute, such as Region and Distribution Center or MicroStrategy User and Distribution Center, where respective security filters merge using OR.
Unrelated Attributes
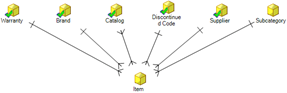
Two filters are considered not related if they are defined as many-to-many, such as Item and Catalog.
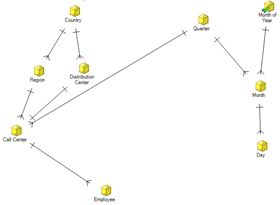
There are some advanced cases that fall into unrelated categories. Unrelated cases are siblings that contain a join path that goes up and down multiple times, such as Employee and Month of Year, where respective security filters merge using AND, not OR. Notice how the join path may start from Employee, all the way to Quarter, then come down to Month, and then go up again to Month of Year.
Merging All Security Filters with AND
You can also configure Intelligence Server to always merge security filters with an AND, regardless of whether they are related.
As in the first method, a user who is a member of both the Movies and Northeast groups would see only information about the Movies category in the Northeast region.
A user who is a member of both the Movies and Drama groups would see only data from the Drama subcategory of Movies, as shown below:
Data for the other subcategories of Drama is not available to this user.
This setting may cause problems if a user is a member of two mutually exclusive groups. For example, a user who is a member of both the Movies and Electronics groups cannot see any data from the Product hierarchy, because that hierarchy does not contain any data that belongs to both the Movies and Electronics categories.
To configure how security filters are merged, you must have the Configure Project Basic privilege.
To Configure how Intelligence Server Merges Multiple Security Filters for a User or Group
- In Developer, log into a project. You must log in as a user with administrative privileges.
- From the Administration menu, point to Projects, and then select Project Configuration.
- Expand the Security Filter category, and then select General.
- Under Security Filter Merge Options, select one of the options:
- Union (OR) Security Filters on related attributes, intersect (AND) Security Filters on unrelated attributes (see Merging Related Security Filters with OR and Unrelated Security Filters with AND)
- Intersect (AND) all Security Filters (see Merging All Security Filters with AND)
- Click OK.
- Restart Intelligence Server for your changes to take effect.
Using a Single Security Filter for Multiple Users: System Prompts
A system prompt is a special type of prompt that does not require an answer from the user. Instead, it is answered automatically by Intelligence Server. System prompts are in the Public Objects/Prompts/System Prompts folder in Developer.
- Like other prompt objects, answers to system prompts are used to match caches. Therefore, users do not share caches for reports that contain different answers to system prompts.
- The system prompts Token 1, Token 2, Token 3, and Token 4 are provided to support using an XQuery source to authenticate users for a MicroStrategy project. For steps to report on and authenticate using XQuery sources, see the Advanced Reporting Guide.
The User Login prompt is a system prompt that is automatically answered with the login name of the user who executes the object containing the prompt. It can provide flexibility when implementing security mechanisms in MicroStrategy. You can use this prompt to insert the user's login name into any security filter, or any other object that can use a prompt.
If you are using LDAP authentication in your MicroStrategy system, you can import LDAP attributes into your system as system prompts. You can then use these system prompts in security filters, in the same way that you use the User Login system prompt, as described above. For instructions on how to import LDAP attributes as system prompts, see Manage LDAP Authentication.
For examples of how to use system prompts in security filters, see:
- Simplifying the Security Filter Definition Process
- Implementing a Report-Level Security Filter
- Using Database Tables That Contain Security Information
To Create a Security Filter Using a System Prompt
- In Developer, from the Administration menu, point to Projects and then select Security Filter Manager.
- From the Choose a project drop-down list, select the project that you want to create a security filter for.
- Select the Security Filters tab.
- Click New.
- Double-click on the text Double-click here to add a qualification.
- Select Add an advanced qualification and click OK.
- From the Option drop-down list, select Custom Expression.
- Type your custom expression in the Custom Expression area. You can drag and drop a system prompt or other object to include it in the custom expression. For detailed instructions on creating custom expressions in filters, see the Filters section of the Advanced Reporting Help.
- When you have finished typing your custom expression, click Validate to make sure that its syntax is correct.
- Click Save and close. Type a name for the security filter and click Save.
Simplifying the Security Filter Definition Process
You can use a system prompt to apply a single security filter to all users in a group. For example, you can create a security filter using the formula User@ID=?[User Login] that displays information only for the element of the User attribute that matches the user's login.
For a more complex example, you can restrict Managers so that they can only view data on the employees that they supervise. Add the User Login prompt to a security filter in the form Manager=?[User Login]. Then assign the security filter to the Managers group. When a manager named John Smith executes a report, the security filter generates SQL for the condition Manager='John Smith' and only John Smith's employees' data is returned.
Implementing a Report-Level Security Filter
You can also use the User Login system prompt to implement security filter functionality at the report level, by defining a report filter with a system prompt. For example, you can define a report filter with the User Login prompt in the form Manager=?[User Login]. Any reports that use this filter return data only to those users who are listed as Managers in the system.
Using Database Tables That Contain Security Information
If your organization maintains security information in database tables, you can use a system prompt to build MicroStrategy security mechanisms using the database security tables. For example, you can restrict the data returned based on a user's login by creating a report filter that accesses columns in your security tables and includes the User Login system prompt. You can also restrict data access based on two or more unrelated attributes by using logical views (database views) and the User Login system prompt in a security filter.