MicroStrategy ONE
Configuring Administrator Accounts for the Lenel® OnGuard® Server
Perform the following procedure to create and test user accounts on the Lenel OnGuard server that are required for the setup of the MicroStrategy Identity adapter.
If you require further assistance with setting up Lenel OnGuard, please contact your certified Lenel system integrator. MicroStrategy is unable to provide technical support beyond what is required for the proper function of the MicroStrategy Identity adapter.
- Create the administrator:
- On the server where Lenel OnGuard is installed, go to Start > Administrative Tools > Computer Management.
- In Computer Management, go to System Tools > Local Users and Groups > Users.
- Right-click on the Users folder, select New Users…, and create a new user.
- In the Computer Management window, choose System Tools > Administrative Tools > Groups.
- In the pane on the right, right-click on Administrators, select Add to Group…, and in the choose the user that you just created.
- Enable remote access for the administrator:
- In the Computer Management window, choose Services and Applications, right-click on WMI Control and select Properties.
- In the WMI Control Properties window, select the Security tab and click the Security button.
- Select Authenticated Users and ensure that all permissions are allowed.
- Add the local directory in Lenel:
- Launch the System Administrator application for Lenel.
- Select the Directories tab on the bottom row and click the Add button in the bottom-left corner.
- Select Windows Local Accounts and click OK.
- In the Name field, enter the directory name. Example: OnGuard Local Directory.
- Next to the Hostname field, click the Browse… button and choose the current Windows domain. Then select the Enable single sign-on check box.
- Select the Authentication tab and choose the Current Windows account radio button.
- Click OK.
- Add the corporate directory in Lenel:
- In System Administration, under the Directories tab, click the Ad button in the bottom-left corner.
- Select Microsoft Active Directory and click OK.
- In the Name field, enter the directory name. Example: OnGuard Corporate Directory.
- Next to the Hostname field, click the Browse… button and choose the corporate domain (Example: corp.example.com). Then select the Enable single sign-on check box.
- Select the Authentication tab on the right and choose Current Windows account.
- Click OK.
- Create the user account in OnGuard:
- Back in System Administration, select the Directories tab on the bottom row. Click the Add button.
- Enter a name for the user. Click the Link… button on the right.
- From the Directory drop-down, select the local directory created in step 3.
- Click the Search button. Select the Windows user(s) you want to associate with the Lenel user.
- From the Directory drop-down, select the corporate directory created in step 4.
- Type in a search parameter and click the Search button. Select the corporate user(s) you want to associate with the Lenel user. Click OK.
- Select the Internal Account tab on the right. Set a name and password for the user.
- Select the Permission Groups tab on the right. Choose the highest permissions for each category.
- In the Segment Access, Area Access Manager Levels, and Monitor Zone Assignment tabs on the right, select all available options.
- Verify user login to OnGuard:
- In the icon bar at the top of System Administration, find the login/logout icon, which is the key icon on the left.
- Click the key icon to log out, which should gray-out most of the other icons.
- Click the key icon to log in. The Log On to System Administration dialog box should indicate that OnGuard is logging in as the current Windows account.
- Verify WMI connectivity to OnGuard:
- Download and install WMI CIM Studio, which is part of WMI tools.
- Launch the WMI CIM Studio application by choosing Start > All Programs > WMI Tools > WMI CIM Studio. The application will open in Internet Explorer by default.
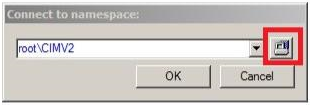
- In the Connect to namespace dialog box, click the icon on the right to browse for the namespace.
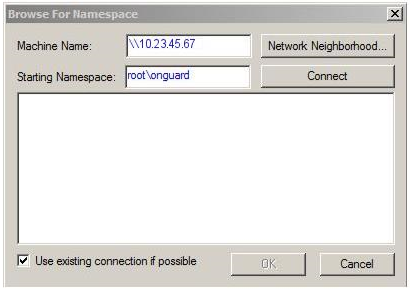
- In the Browse For Namespace dialog box, the machine name should be double backslashes followed by the IP address of the OnGuard machine (Example: \\10.23.45.67). The starting namespace should be root\onguard. Click the Connect button.
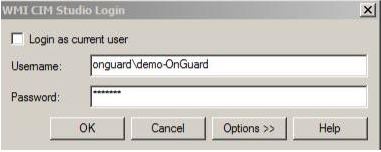
- In the WMI CIM Studio Login dialog box, leave the box cleared for Login as current user. Type the local user domain and account (for example: onguard\demo-OnGuard) with the Lenel account password. Click OK.
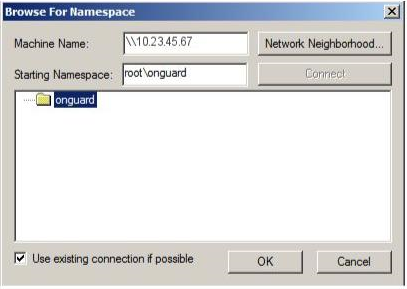
- When login succeeds, an onguard folder appears in the Browse For Namespace dialog box. Click OK to open the folder.
- The list of Lenel classes appears. This verifies that the user account has access to read data from Lenel OnGuard.
