MicroStrategy ONE
Time Based Reporting
Starting in MicroStrategy ONE Update 12, you can create Gregorian-based calendars. You can easily control the size and location of warehouse tables that are the backbone of Smart Attributes.
Starting in MicroStrategy 2021 Update 10, users can choose an interface language for language objects.
MicroStrategy 2021 Update 8 brings refreshed approach to the time dimensions in MicroStrategy, as well as a set of unique capabilities for time dimensions. Time zone based reporting makes your data time zone sensitive, giving users option to filter and group data by time values in different time zones.
To compliment this feature, we have released a new set of smart attributes. These smart attributes represent different intervals of time and allow you to seamlessly create a complete time hierarchy without the need to create separate attributes for each dimension and maintain relationships between them.
The languages feature allows you easily internationalize your environment. You can set formatting for smart attributes in Library. This allows consistent formatting across a particular region. Language objects also allow control of the interface language in Library if the language is supported out of the box.
The following languages are supported out of the box: Chinese (Simplified), Chinese (Traditional), Danish (Denmark), Dutch (Netherlands), English (United Kingdom), English (United States), French (Belgium), French (France), French (Switzerland), German (Germany), German (Switzerland), Italian (Italy), Italian (Switzerland), Japanese, Korean, Polish, Portuguese (Brazil), Spanish (Spain), and Swedish (Sweden).
Check out the following topics to get started:
Prerequisites
-
Database values must be stored in TimeStamp format, in UTC, without a time zone offset.
-
The following databases are supported. Make sure that the data source you are using has time zone support enabled.
-
AlloyDB
-
Amazon Redshift
-
Azure Synapse Analytics
-
Exasol
-
Google BigQuery
-
IBM Db2
-
Microsoft SQL Server 2012
-
Microsoft SQL Server 2014
-
Microsoft SQL Server 2016
-
Microsoft SQL Server 2017
-
Microsoft SQL Server 2019
-
MySQL 5.x
-
MySQL 8.x
-
Oracle 12c
-
Oracle 12c R2
-
Oracle 18c
-
Oracle 19c
-
Oracle 21c
-
PostgreSQL
-
SAP HANA 2.x
-
Snowflake
-
Teradata 16.x
-
Teradata 17.00
Google BigQuery only supports time zone based reporting. Smart Attributes are unavailable due to GBQ driver limitations on bulk insert support. MicroStrategy is working with the vendor to resolve the defect.
-
-
A calendar builder report, that enables smart attributes, is available for the above gateways only through ODBC connectivity.
-
The data engine version in a project that uses any Internationalization objects must be set to version 2021 or newer.
-
MicroStrategy creates managed relationship tables in your database to utilize smart attributes.
-
Internationalization objects created prior to MicroStrategy 2021 Update 8 are not compatible and must be recreated. If you previously used time zone based reporting as a preview feature, MicroStrategy recommends deleting all existing objects before upgrading to 2021 Update 8.
-
Time zone based reporting and smart attributes are only available for projects using project schema. MTDI is not supported.
-
Click here to see the 43 base languages our formatting feature supports.
Chinese (Simplified), Chinese (Traditional), Danish (Denmark), Dutch (Netherlands), English (United Kingdom), English (United States), French (France), French (Switzerland), German (Germany), German (Switzerland), Italian (Italy), Italian (Switzerland), Japanese, Korean, Polish, Portuguese (Brazil), Russian, Spanish (Spain)(Modern), Spanish (Spain), Swedish (Sweden), Portuguese (Portugal), Spanish (Mexico), French (Canada), Hungarian, Croatian, Czech, Slovak, Slovenian, Bosnian, Serbian - Cyrillic, Serbian - Latin, FYRM - Macedonian, Albanian, Bulgarian, Finnish, Greek, Romanian, English (Australia), English (New Zealand), Norwegian - Bokmål, Norwegian - Nynorsk, Latvian, Turkish
Compatibility
-
Time zone based reporting is only available in dashboards and not supported in reports and documents.
-
Smart attributes are only supported in dashboards, reports, and Intelligent cubes only. You can use them in a similar fashion as regular attributes.
-
MicroStrategy Web: Time zone based reporting is not available in MicroStrategy Web. MicroStrategy strongly recommends authoring or consuming dashboards using Workstation, Library, or the MicroStrategy app.
-
Library Mobile: Time zone based reporting is currently only available on iOS. Library Mobile offers the consumption experience only. Users can switch time zones through Filter panel.
-
MicroStrategy Application: Time zone based reporting is not yet supported.
-
MicroStrategy Developer: MicroStrategy discourages editing any objects in Developer that use internationalization features. While objects used by internationalization features may be visible in Developer (such as base attributes for smart attributes or time zone aware attributes), they should only be edited through Workstation. This applies to editing any objects and attaching internationalization-related objects to them.
Administration: Create Internationalization Objects
To use the time zone based reporting feature, you must create at least one time zone in your environment.
You must have the Administrator set of privileges to create and manage Internationalization objects.
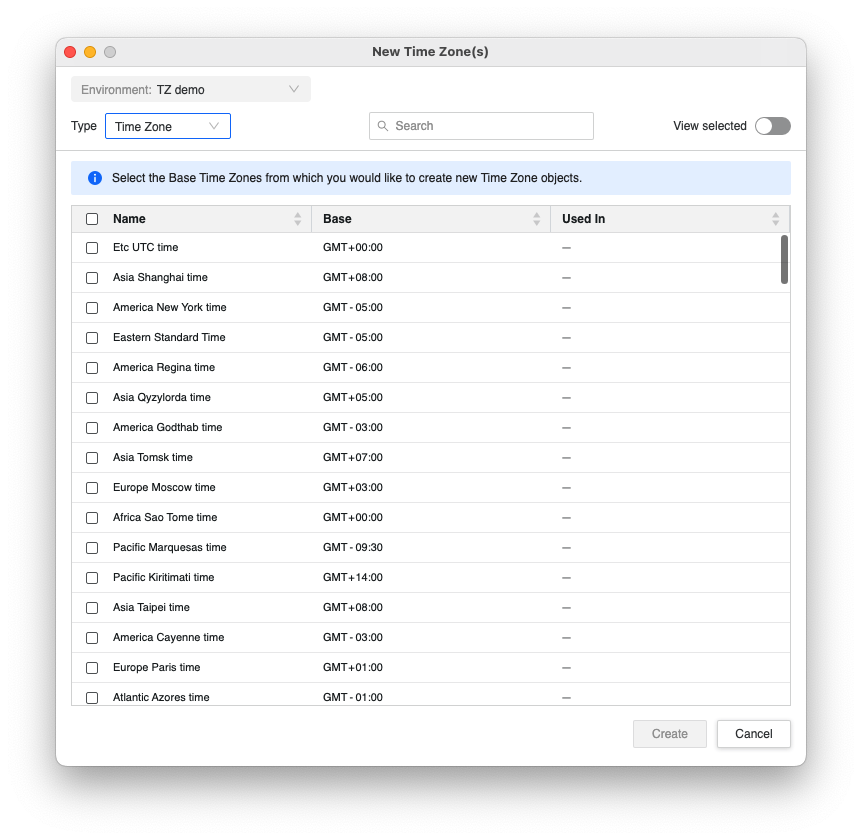
Add Time Zones to Your Environment
-
Open the Workstation window.
-
In the Navigation pane, click
 , next to Internationalization.
 -
In Type, choose Time Zone.
-
Select the time zones you want to add.
-
Click Create.
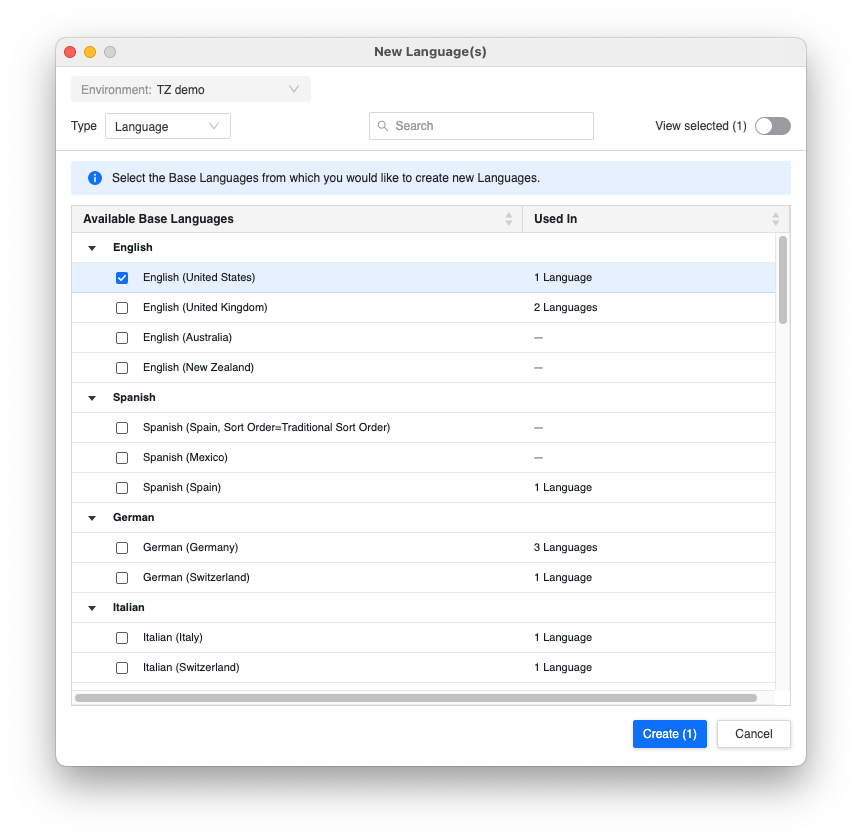
Add Languages to Your Environment
-
Open the Workstation window.
-
In the Navigation pane, click
, next to Internationalization. -
In Type, choose Language.
-
Select the base languages for your objects. Base languages have formats relevant to the given language and region to choose from.
-
Click Create.
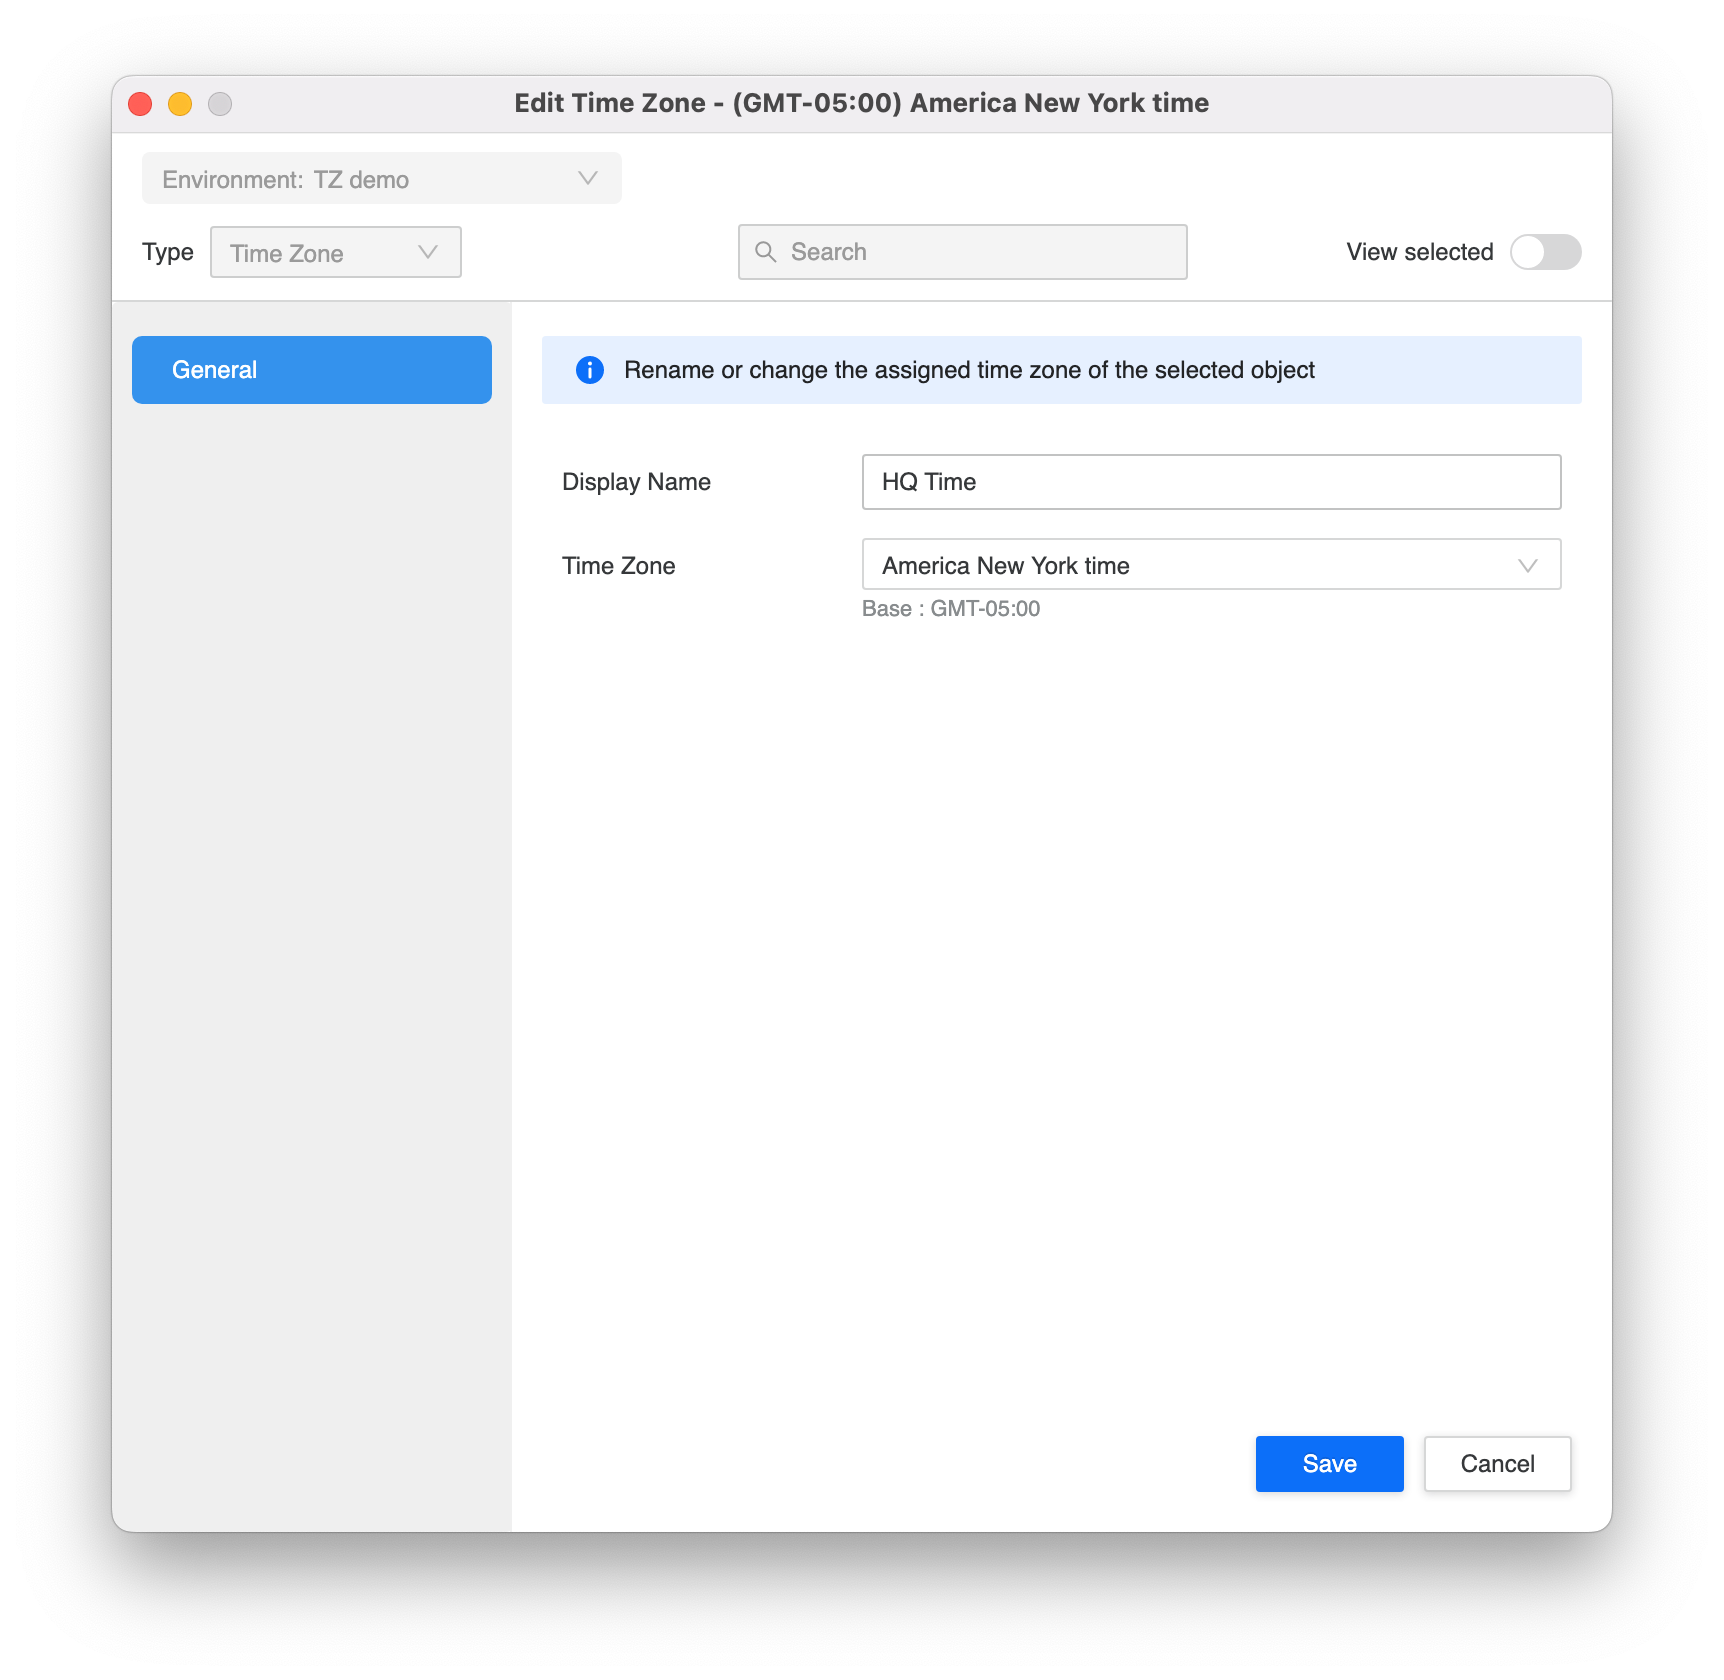
Edit Time Zone Objects
-
In the Navigation pane, click Internationalization.
-
Right-click a time zone object and choose Edit.
-
Change the display name or assigned time zone.
-
Click Save.
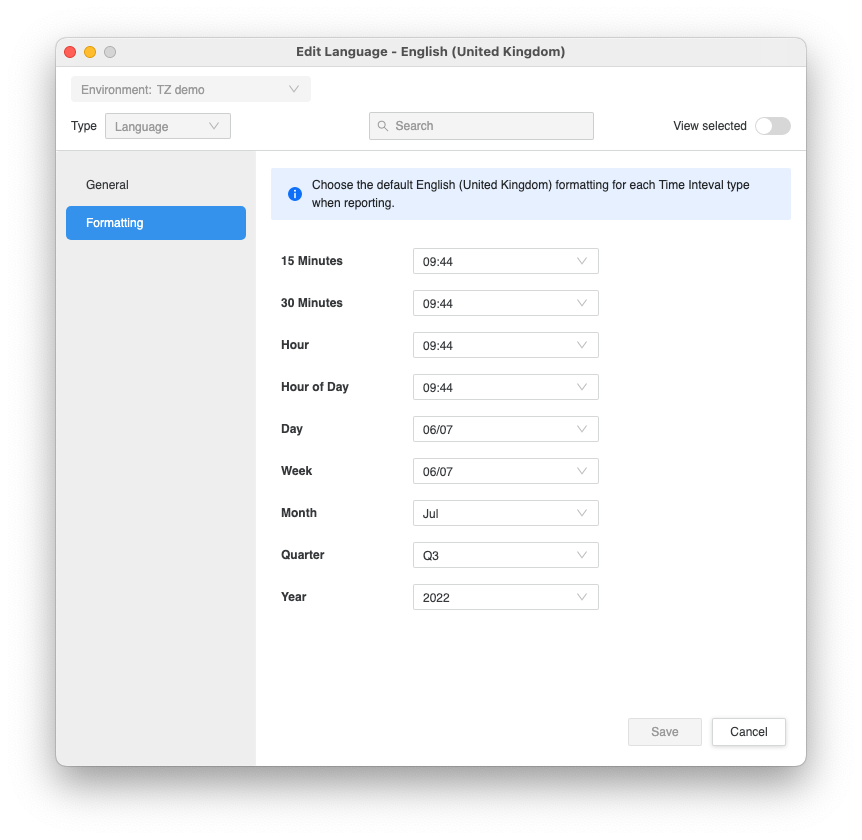
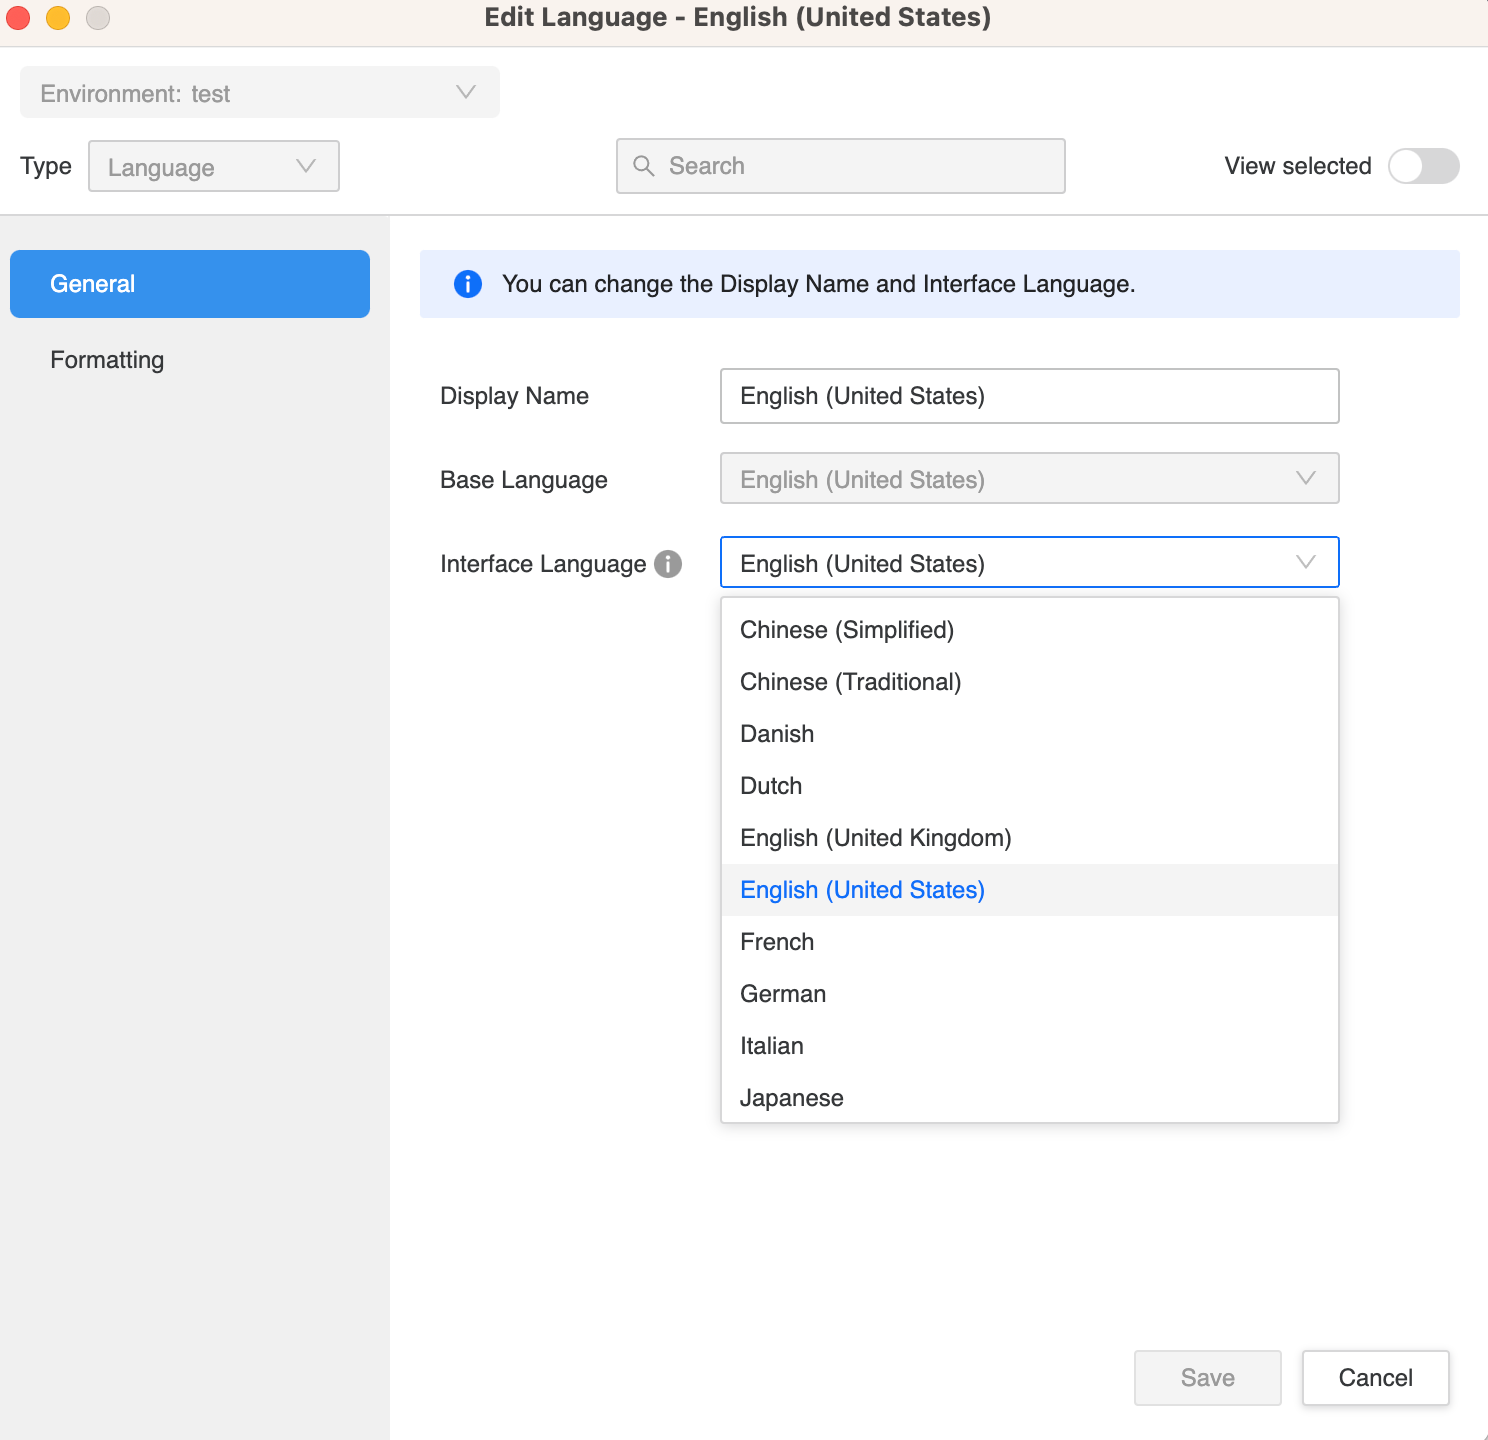
Edit Language Objects
-
In the Navigation pane, click Internationalization.
-
Right-click a language object and choose Edit.
-
Change the display name.
-
Starting in MicroStrategy ONE Update 11, you can choose the desired interface language from the Interface Language drop-down.
- Users that use out-of-the-box languages should choose the same language defined in Base Language.
- Users that use non-out-of-the-box languages should choose Best Fit.
-
In the left pane, click Formatting.
-
Choose the desired formatting from drop-down for each of smart attribute intervals. Available formatting options are dependent on the base language choice.
-
Click Save.
To delete time zone objects, make sure they are not used in other objects such as dashboards or projects, as this will prevent their deletion.
-
In the Navigation pane, click Internationalization.
-
Select the objects you want to delete.
-
Right-click your selection and choose Delete.
-
At the prompt, click Delete.
Users have the View privilege for all internationalization objects by default.
-
In the Navigation pane, click Internationalization.
-
Right-click the internationalization object and choose Properties.
Choose Get Info if you are using a Mac.
-
In the left pane, click Security Access.
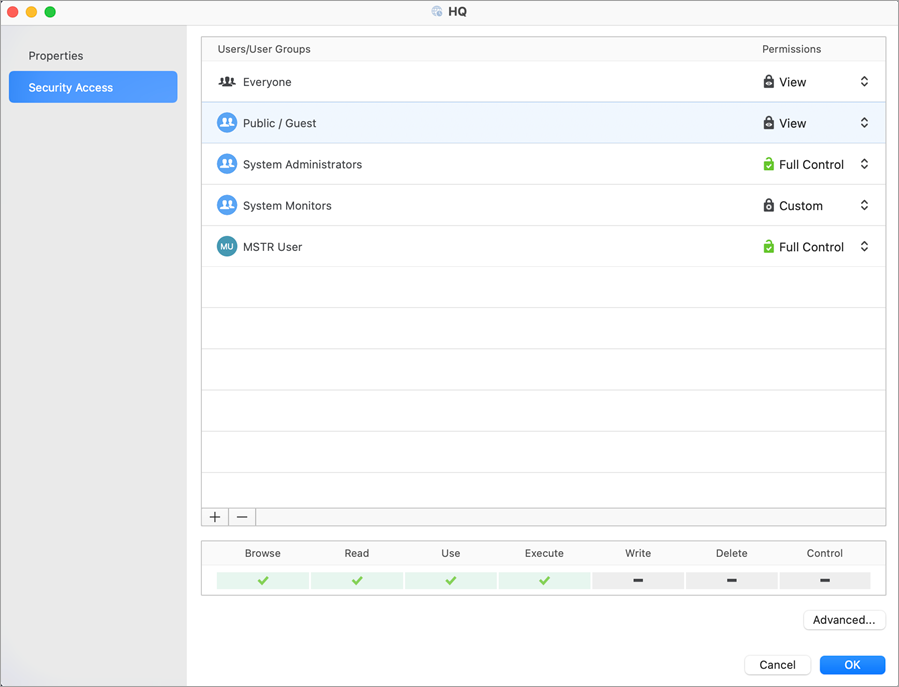
-
Select users or user groups to modify their permissions.
-
Click
 to add a new control list.
 -
Select single users or entire user groups and click Add.
-
Click OK.
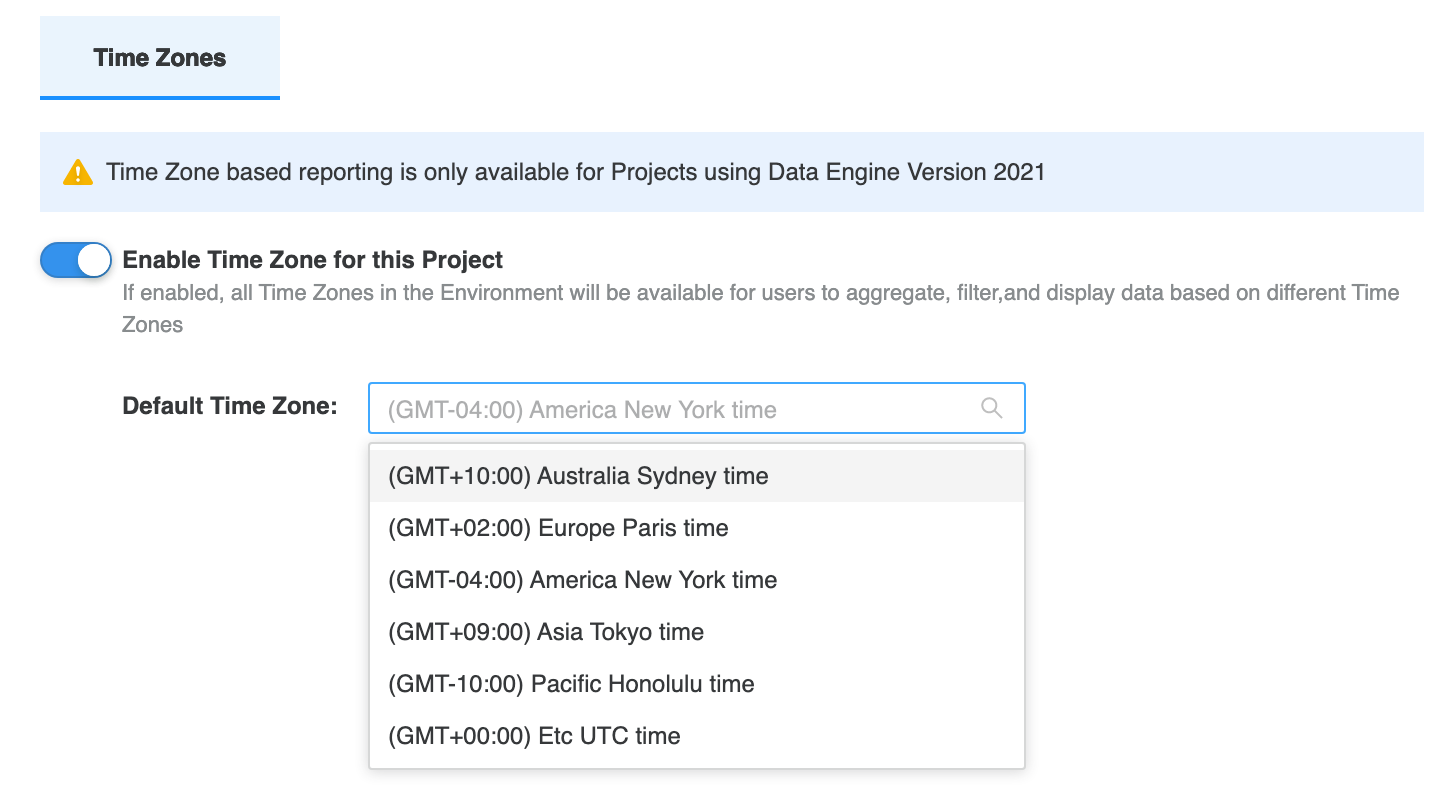
Enable Time Zone Based Reporting in a Project and Set the Project-Level Default Time Zone
To use time zone based reporting you must enable the feature and set a default time zone for a project.
-
Open the Workstation window.
-
In the Navigation pane, click Projects.
-
Right-click a project and choose Properties.
Choose Get Info if you are using a Mac.
-
In the left pane, click Internationalization.
-
Turn on Enable Time Zone for this Project.
-
In Default Time Zone, select a custom time zone.
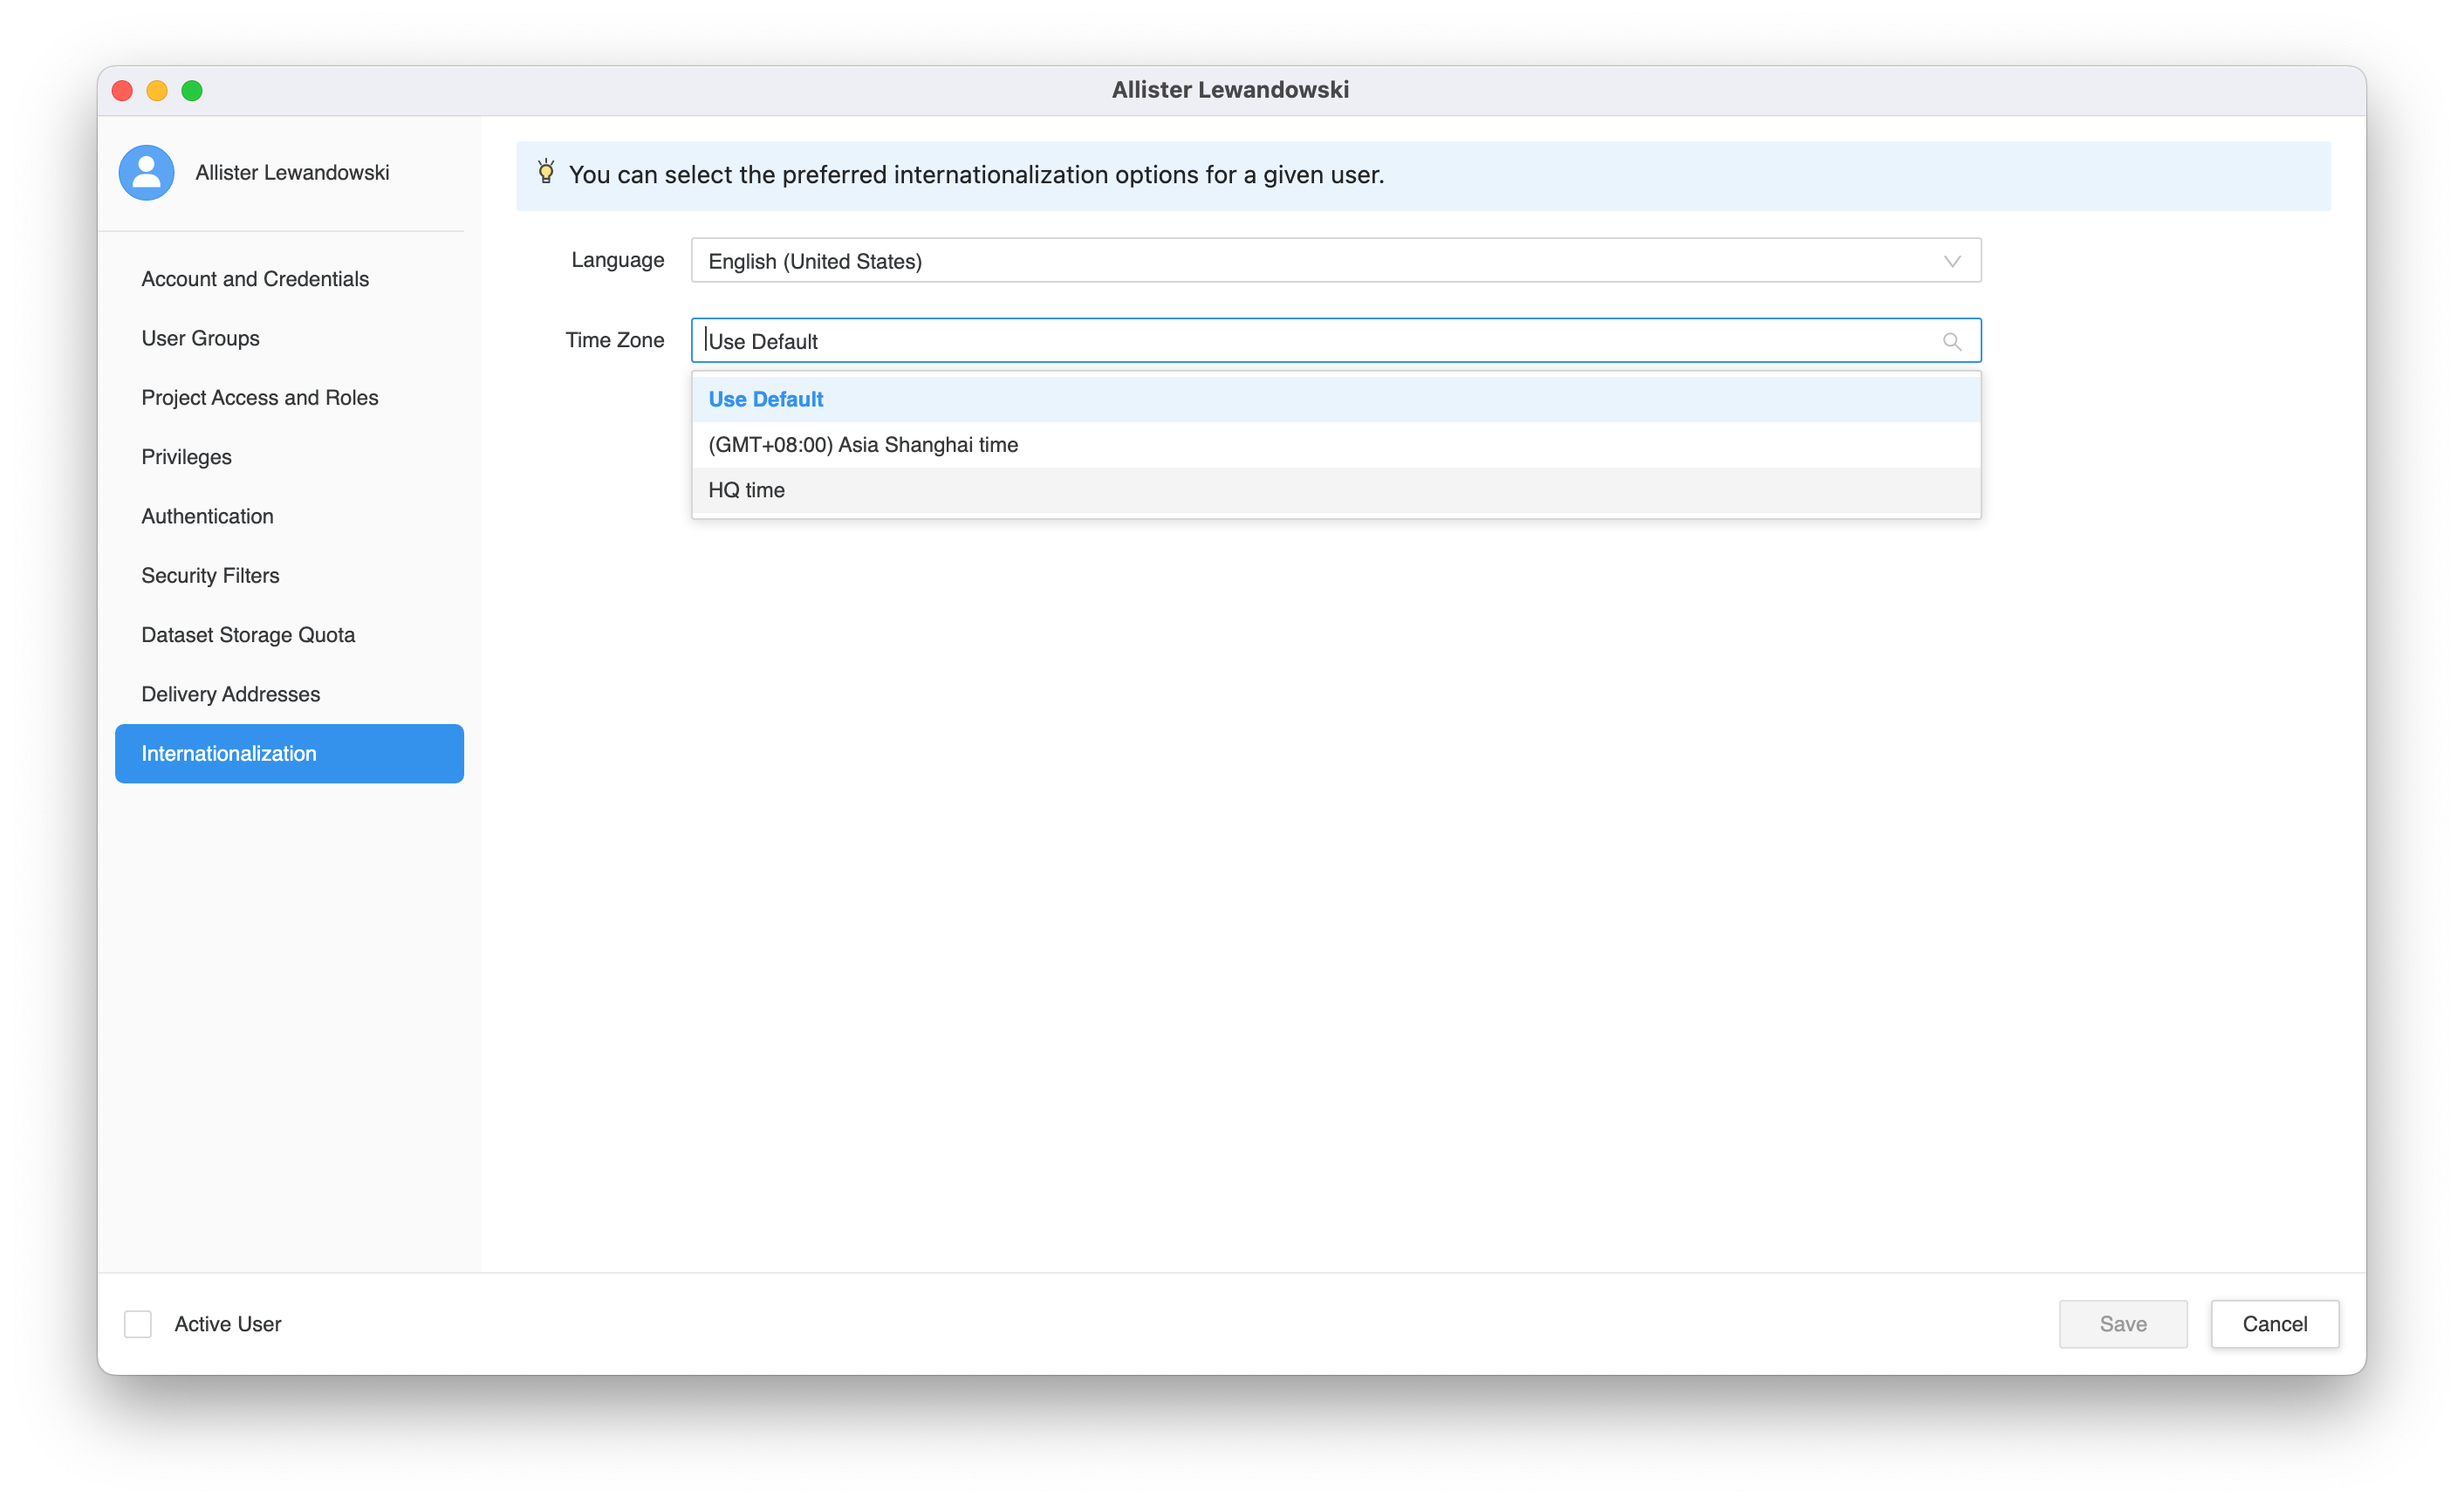
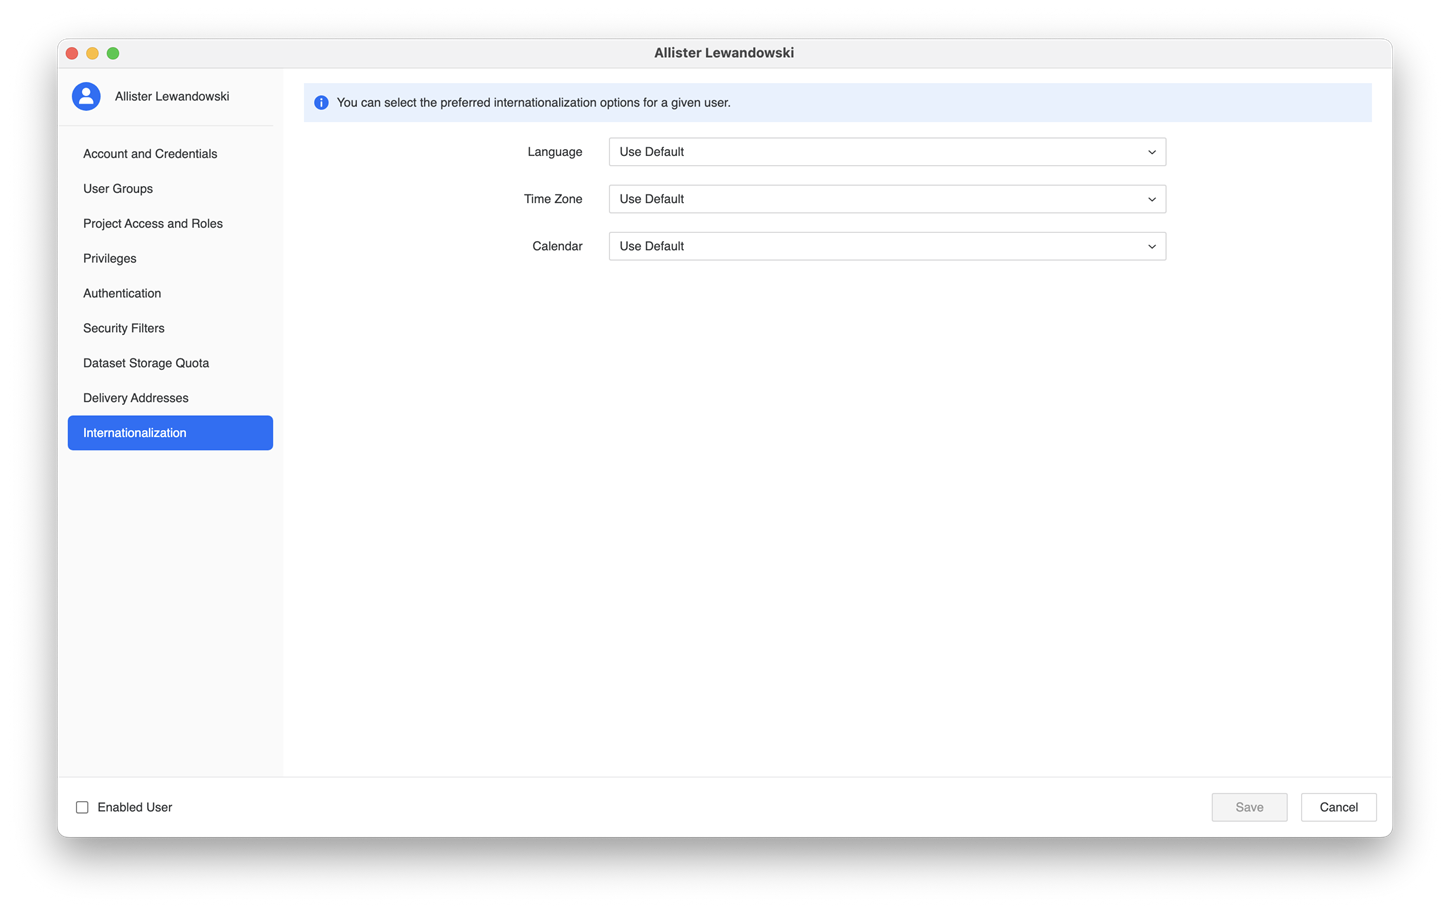
Assign Default Internationalization Objects for Users
Internationalization objects cannot be applied to user groups due to possible conflicting rules if users are members of multiple groups.
-
In the Navigation pane, click Users and Groups.
-
Right-click a user and choose Edit.
-
In the left pane, click Internationalization.
-
Select the default internationalization objects for the user.
Modeling: Create Time Zone Aware Attributes and Smart Attributes
Create Time Zone Aware Attributes
Time zone aware attribute must be a single form with the TimeStamp data type. Forms other than key and relationships are removed if this setting is enabled.
-
In the Navigation pane, click
, next to Objects. -
Choose your environment and project.
-
Select Attribute and click Select.
-
Enter an attribute Name.
-
In the table header, click Add New Form.
-
Select a table and column with the appropriate data type.

-
Select Time Zone Aware to allow users to filter and group data by time values in different time zones. The project level setting must be enabled for this option to appear.
-
Click Save.
-
Update your schema to view the changes.
About Smart Attributes
Smart attributes represent different intervals of time, allowing you to easily create a complete time hierarchy without a need to create separate attributes for each dimension, maintaining hierarchy and relationships between them.
Activating time zone awareness to create smart attributes is not required. While these two features compliment each other, you can use them separately. A smart attribute's base attribute must have TimeStamp data type. A base attribute can have additional forms. If you are upgrading existing attributes to include smart attributes, all relationships are removed for the base attribute.
Interval periods are fixed and cannot be changed. The editor allows you to change sorting behavior for each smart attribute, as well as each smart attribute name. By default, the name is [base attribute name] ([interval duration]). Fifteen minute smart attributes are always created if higher intervals are created. MicroStrategy automatically creates relationships between base attributes and all smart attributes.
The Attribute Editor for a specific base attribute is the only place where smart attributes can be created, edited or deleted.
To use this feature, MicroStrategy must create managed tables in your database.
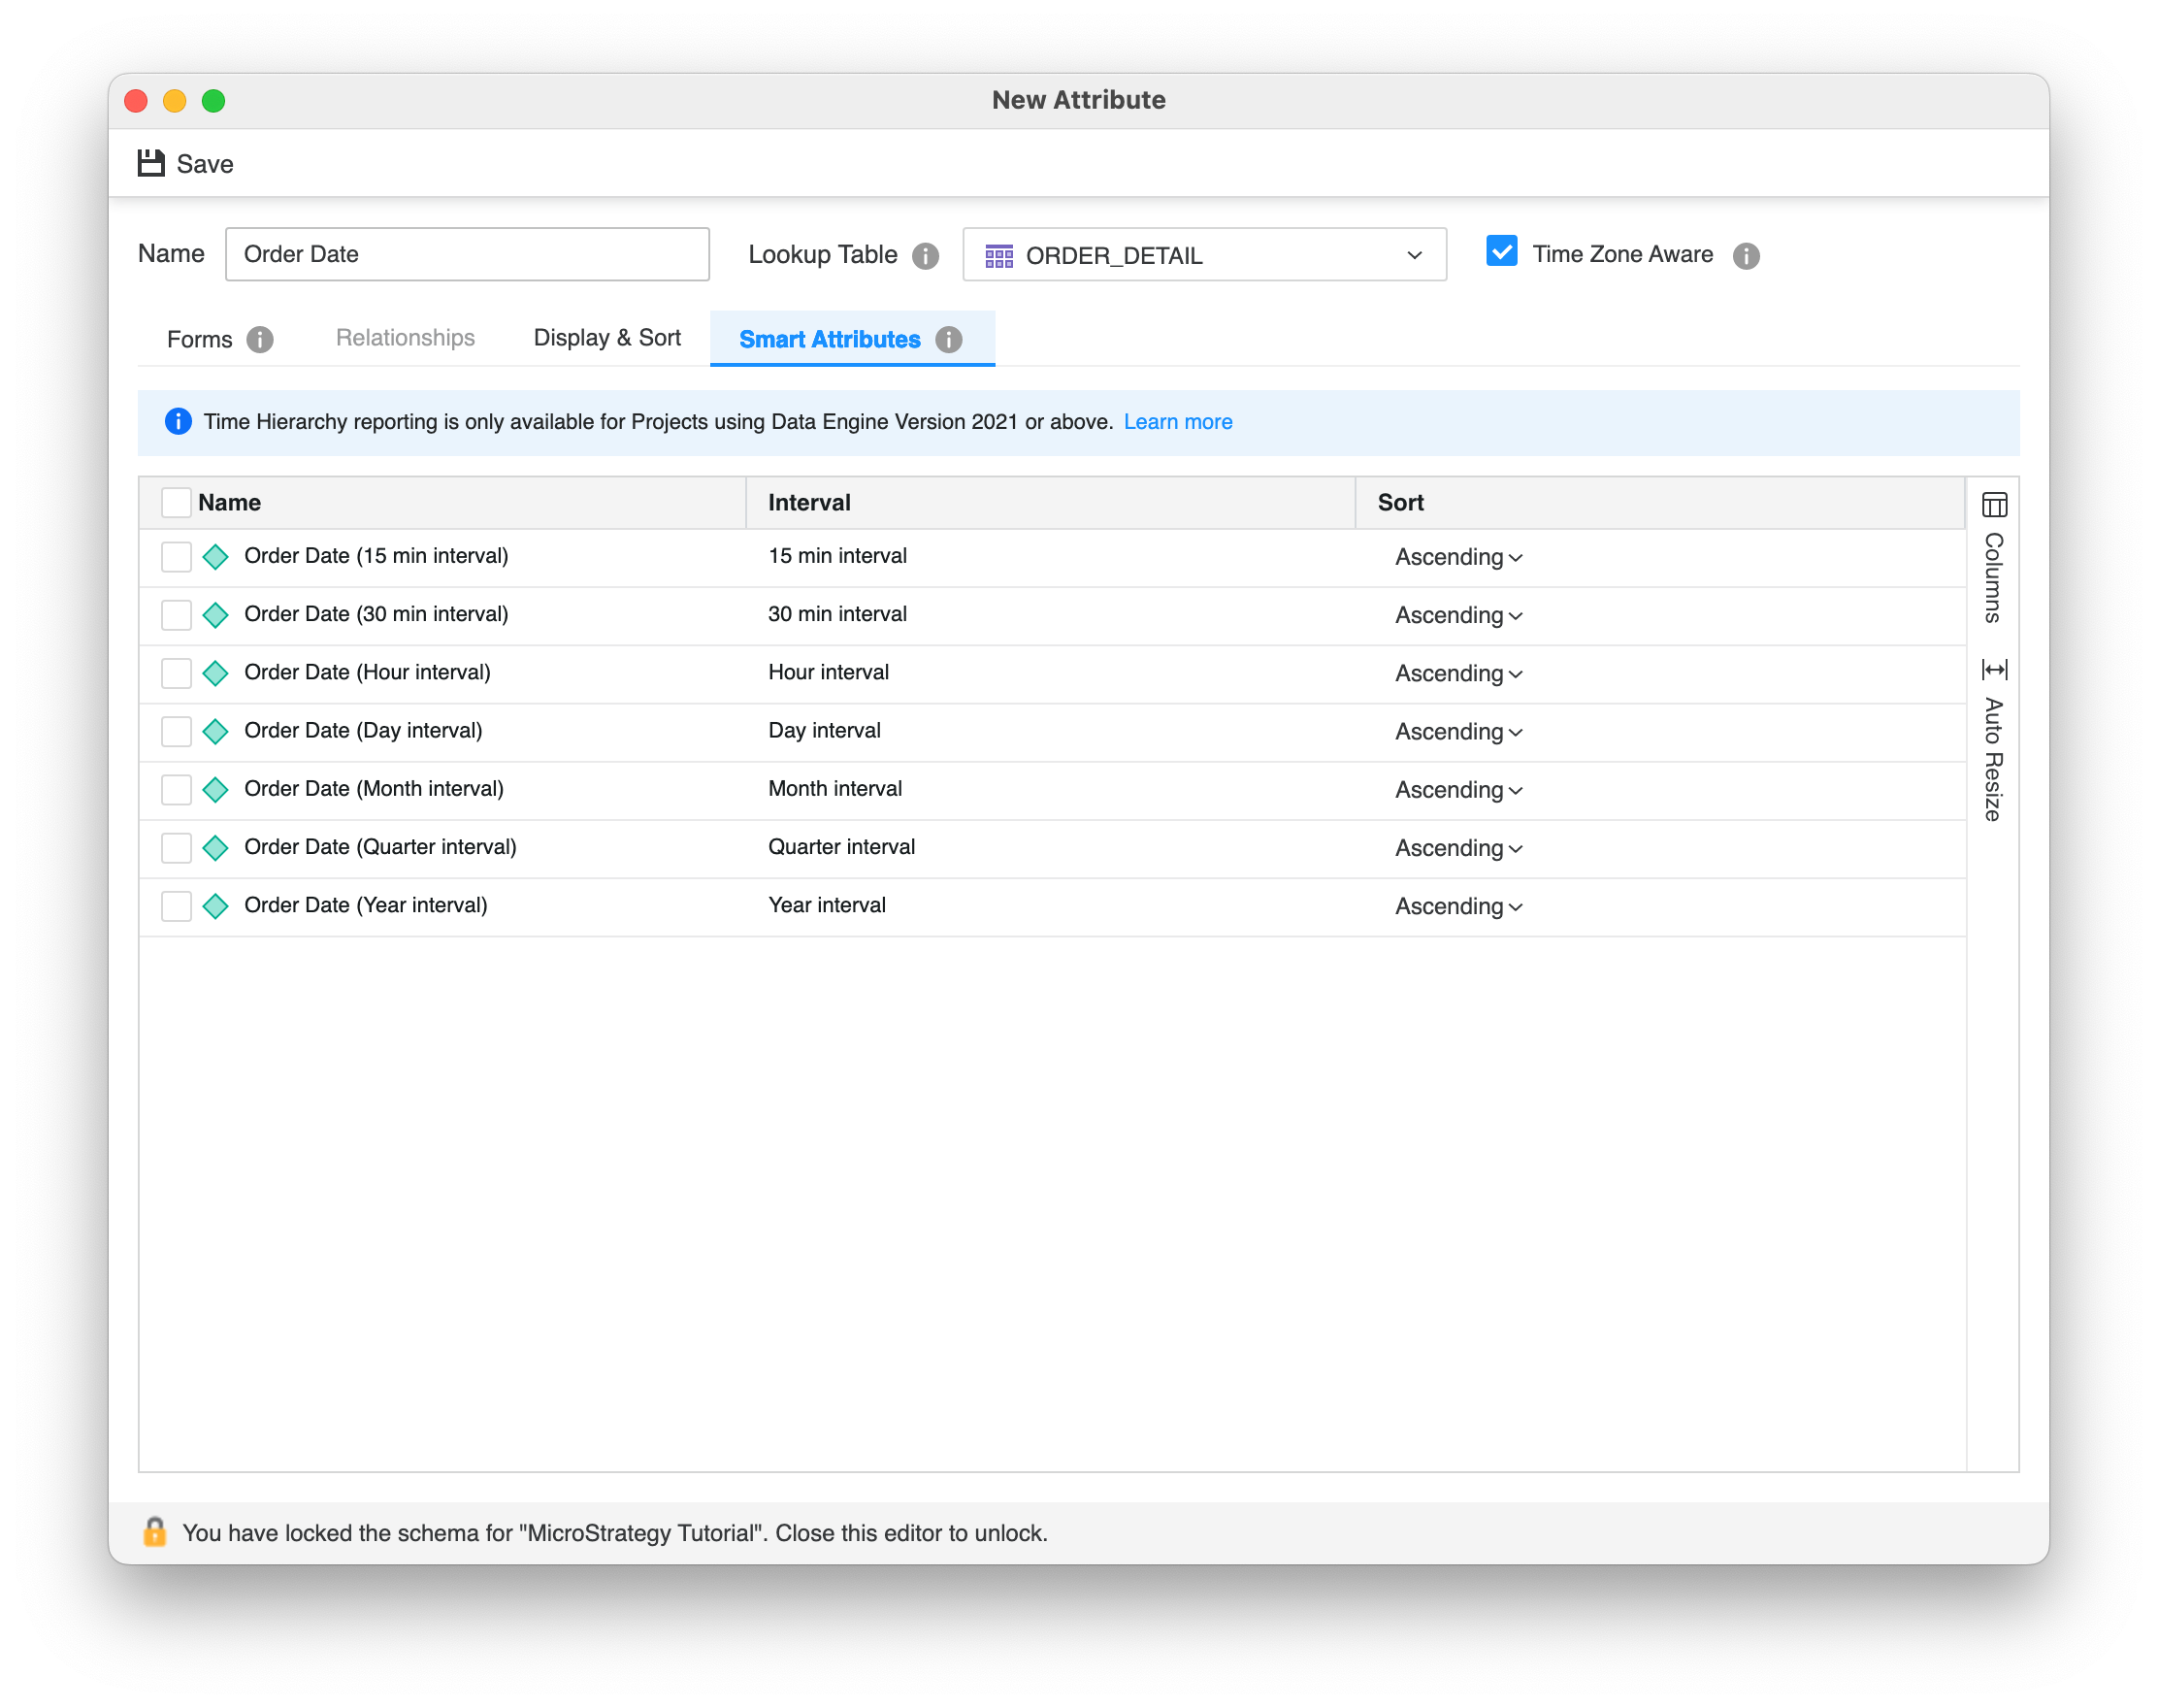
Create Smart Attributes
-
In the Navigation pane, click
, next to Objects. -
Choose your environment and project.
-
Select Attribute and click Select.
-
Enter an attribute Name.
-
In the table header, click Add New Form.
-
Select a table and column with the appropriate data type.
-
Click the Smart Attributes tab.
-
Select the desired intervals.
-
Click Save.
-
Update your schema to view the changes.
System Hierarchy
To view your newly created time hierarchy, open the System Hierarchy Editor. A hierarchy created with smart attributes cannot be modified in this editor.
-
In the Navigation pane, click Schemas.
-
Right-click the schema for the project you want to view and choose View Hierarchy.
-
Browse the hierarchies available for your project.
Initial Execution of Smart Attributes
MicroStrategy creates managed tables in your database that serve as lookup and relationship tables for smart attributes. Upon the initial execution of objects with smart attributes, a job is triggered to create these tables. The following error message also appears.
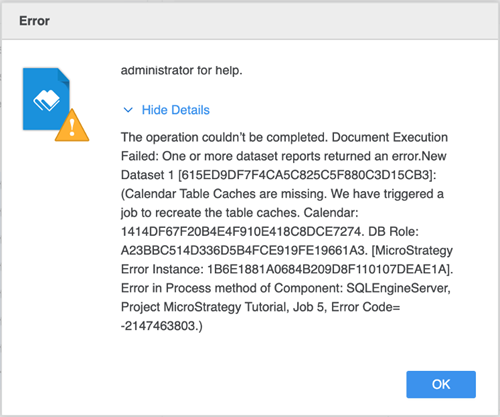
Once the error message appears, you can track the progress of the calendar build report through the job monitor.
-
In the Navigation pane, click Monitors.
-
In the left pane, click Jobs.
-
If the job is not visible, click Refresh
 in the top left to manually refresh the job list.
Learn more about smart attributes in KB485831 and the calendar builder report in KB485832.
Dashboard Authoring
-
Once an attribute marked as time zone aware is added to the dataset, open the Filter panel and click
 to manage dashboard behavior in the consumption layer.
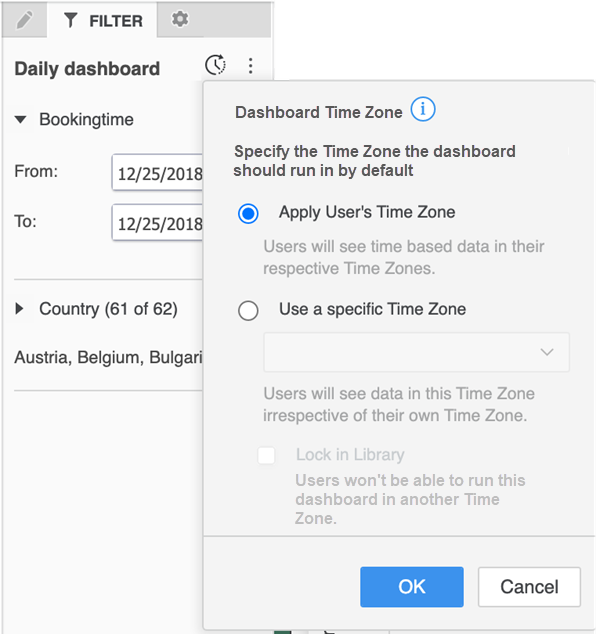
-
Select Apply User's Time Zone to open the dashboard in the time zone set for the user in their Library preferences. The time zone can also be assigned by the Administrator though the User Editor. If the user does not have a time zone specified, the dashboard opens in the project's default time zone.
-
Select Use a specific Time Zone to set the default time zone in which the dashboard opens, regardless of user preference. Users can change the time zone in the consumption layer. When you select a time zone, the data automatically adjusts to that time zone.
If you want to prevent users from changing the time zone in the consumption layer, select Lock in Library to prevent any changes.
Intelligent Cubes
Intelligent cubes support time zone based reporting. Data in Intelligent cubes can be either marked as available for time zone conversion when running objects against it or set within a specific time zone.
-
In the Navigation pane, click
, next to Objects. -
Choose your environment, project, and Intelligent Cube as your dataset type.
-
Add time zone aware attributes to the cube. Add additional attributes and metrics as needed.
-
Open the Internationalization menu
-
Select the desired Time Zone. If this setting is left as Default, the Intelligent cube is published using the default time zone selected for project.
-
Enable Time Zone and Calendar based translations is selected by default, giving users the option to switch between time zones in objects created on top of the cube. This makes your cube a multiple time zone Intelligent cube. To lock data to a specific time zone and prevent users from switching time zones in objects created on top of the cube, deselect Enable Time Zone and Calendar based translations checkbox. This makes your cube a single time zone Intelligent cube.
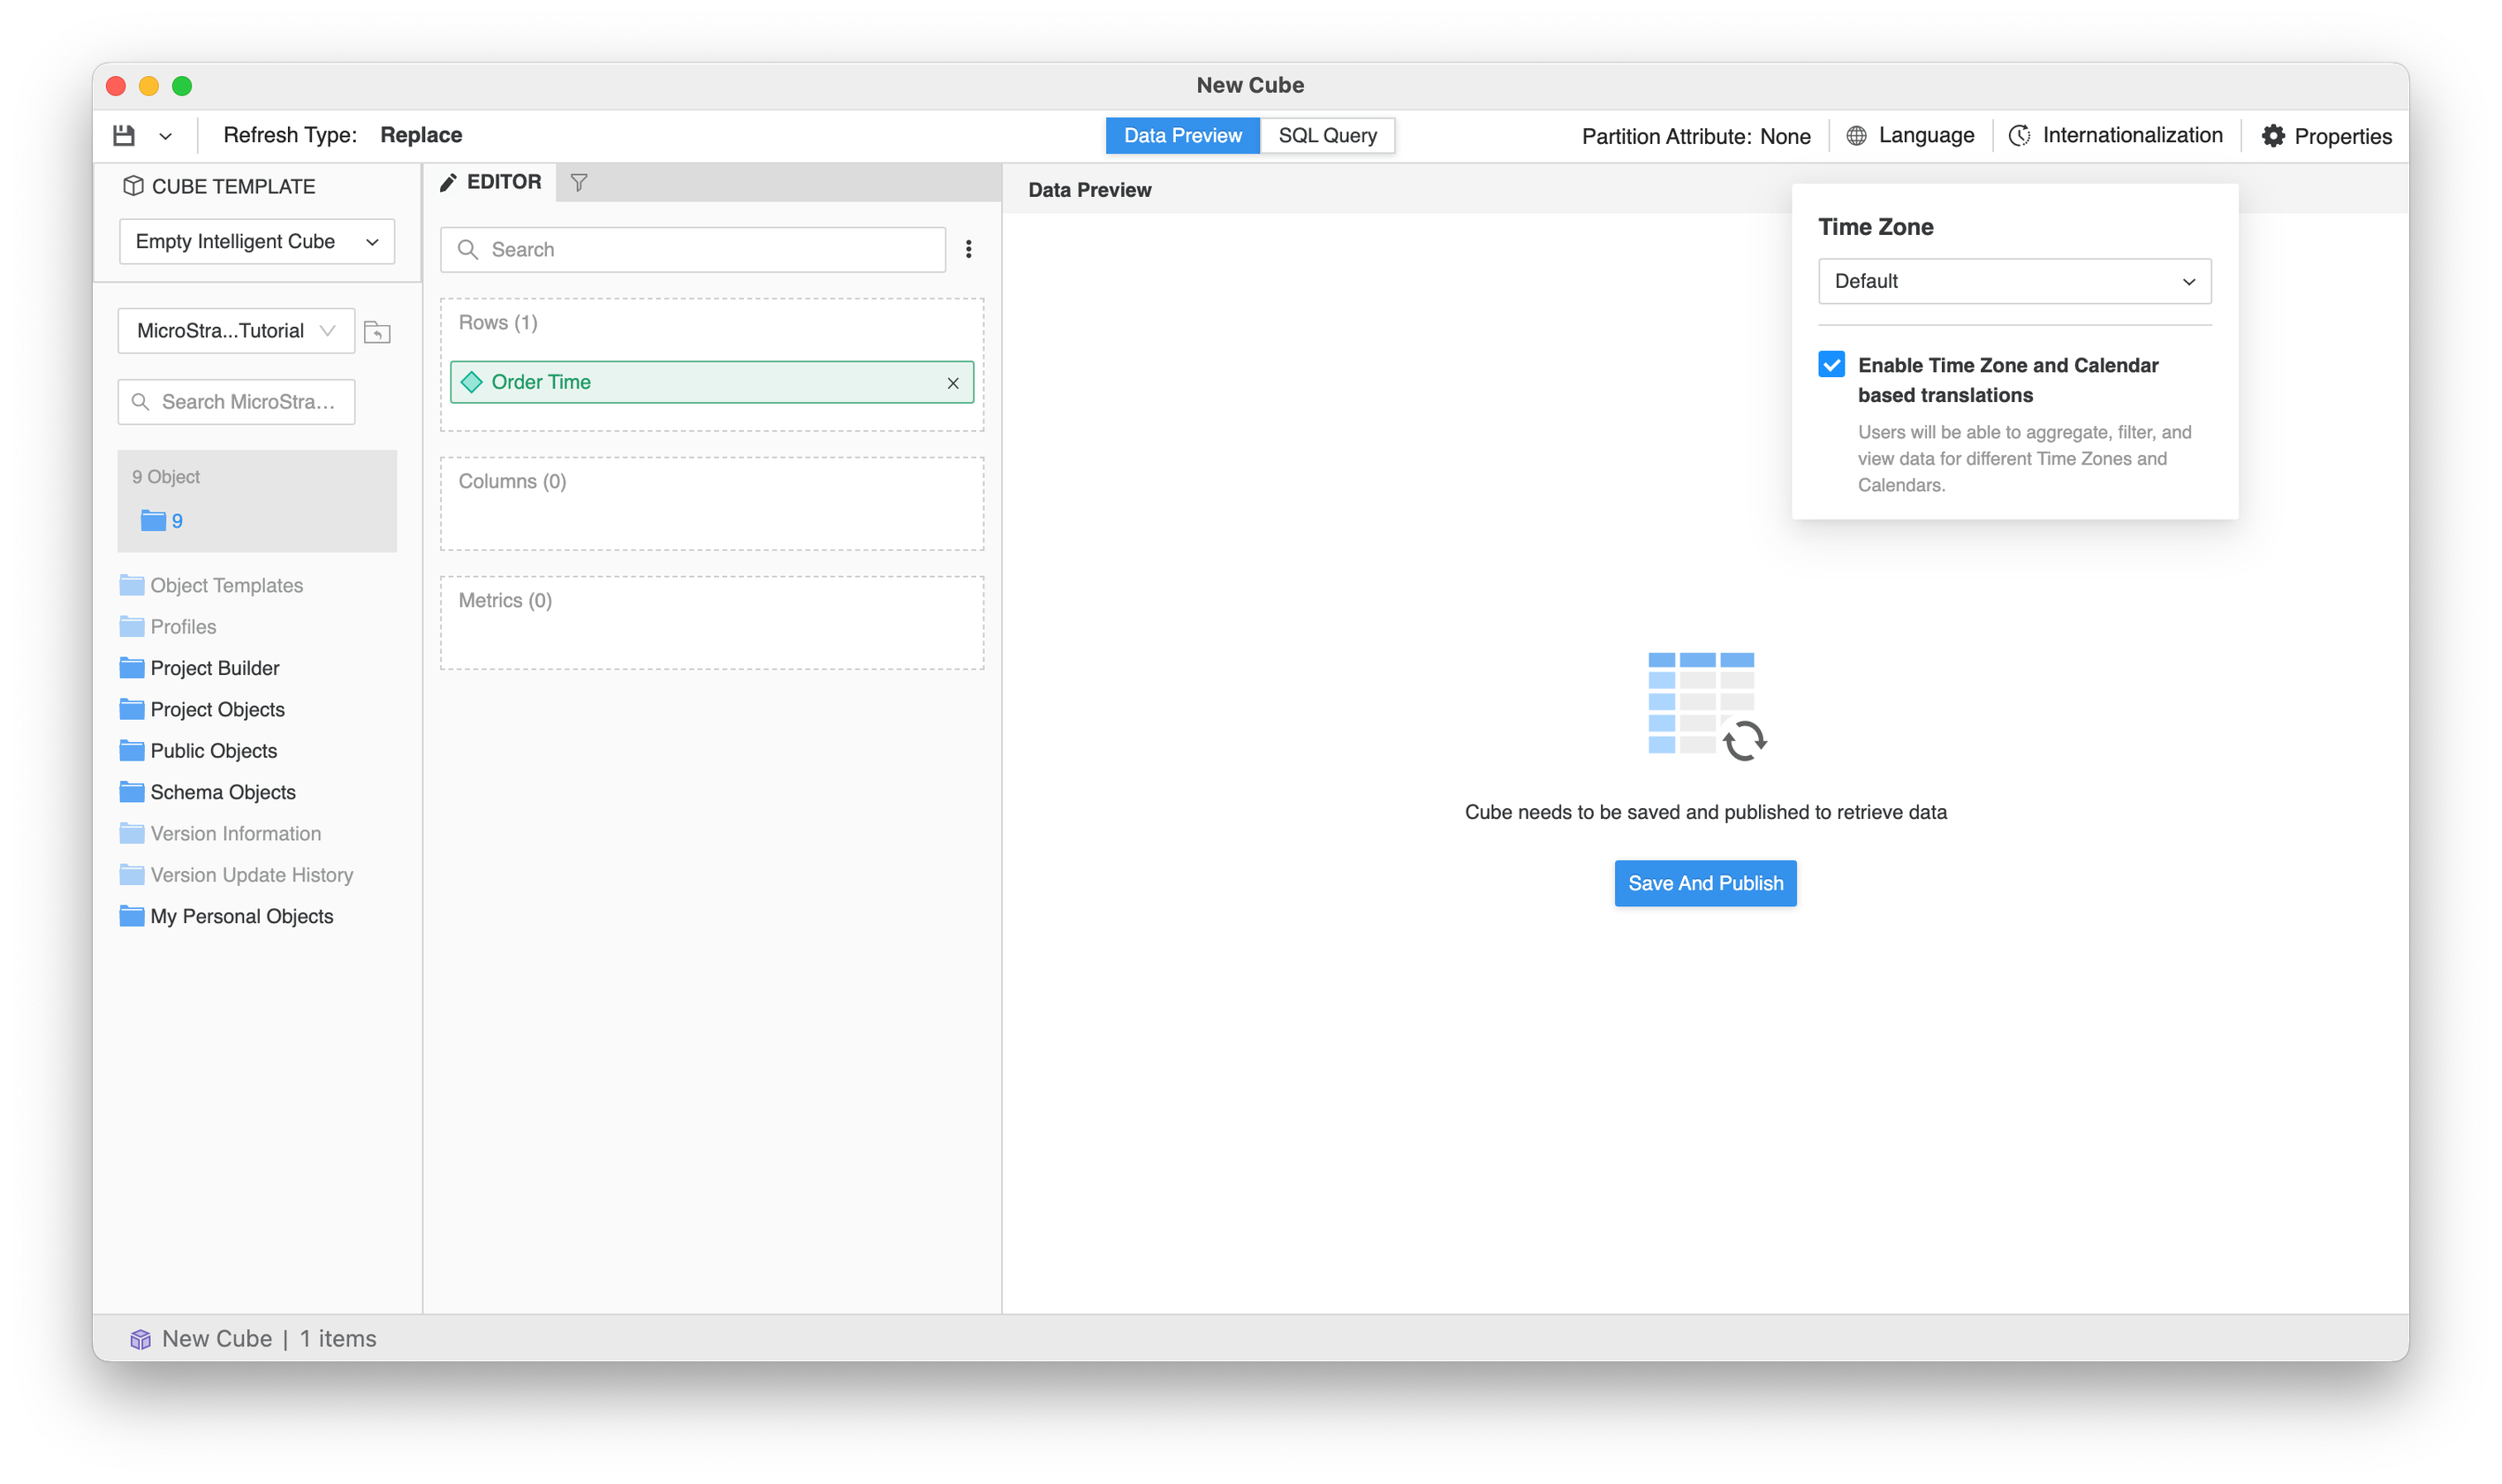
-
Save and Publish the cube.
Formatting
Smart attributes can follow formatting settings from the language object. Follow the steps below to make attributes subject to these changes in the consumption layer.
-
In a dashboard, open the Datasets panel. Starting in MicroStrategy 2021 Update 9, you can also set this formatting at the dashboard level using the Editor panel.
-
Right-click a smart attribute and choose Number Format.
-
Change Automatic to [Interval duration].
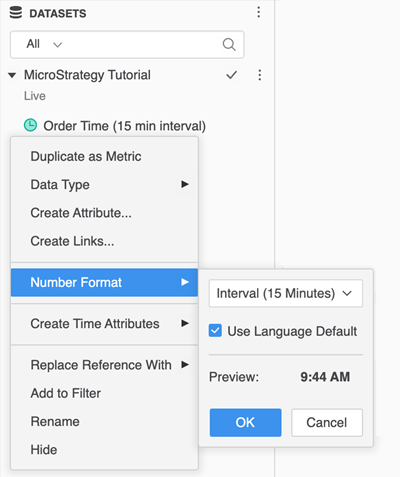
-
Use Language Default is enabled by default. If you want to assign different formatting within your dashboard for smart attributes, deselect this option and choose a different one.
-
Click OK.
Change Time Zones and Languages in Library
In Library Web and Library Mobile iOS, you can change time zones and languages. Your dashboard must contain a time zone aware attribute.
Change Time Zones for Your Dashboard Data
-
Open a dashboard that contains a time zone aware attribute.
-
To change the dashboard's time zone, click Filter.
-
Select an available time zone and click Apply.
Set the Default Time Zone and Language
-
Click Account.
-
Go to Preferences > My Time Zone.
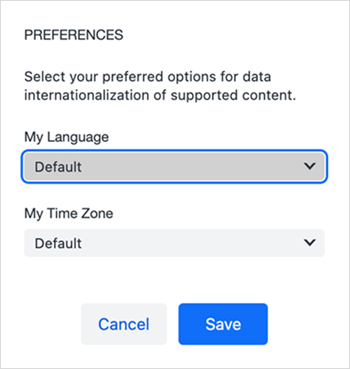
-
Select your preferred language and time zone.
-
Reopen your dashboard to see a time zone change. You must log into Library again to see a language change.
Share Dashboards with a Selected Time Zone
Bookmarks in Library save the time zone in which you viewed your content. To save a bookmark, go to Bookmark > Add New.
Change Dashboard Time Zones in Library Mobile
-
In Library Mobile, open a dashboard with a time zone aware attribute.
-
Tap Filter
 .
. -
Click Dashboard Time Zone.
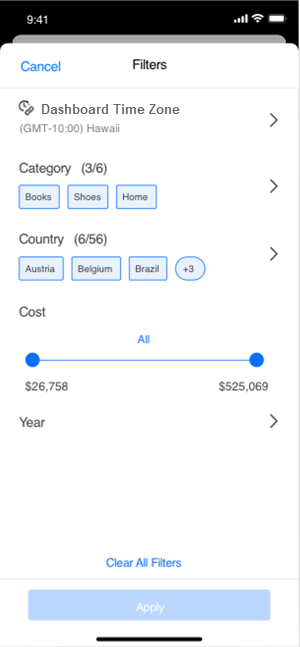
-
Select the desired time zone.
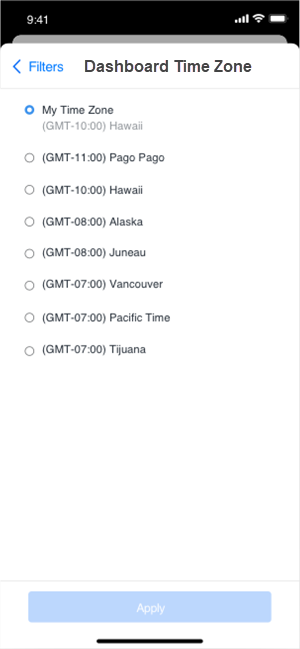
-
Click Apply.
Object Migration
-
Internationalization objects can be migrated in the same way as all MicroStrategy objects through migration packages in Workstation.
-
When you migrate objects (dashboards, reports, cubes) that are using time zones in their definition, you must create a package that contains both the object and time zone object used by that object. There is no need to include a time zone object when the target environment already has the same time zone object.
-
Always migrate base attributes with all corresponding smart attributes. Partial migration of smart attributes will result in an error.
Calendar Based Reporting
-
Open the Workstation window.
-
In the Navigation pane, click
, next to Internationalization. -
In Type, choose Calendar.
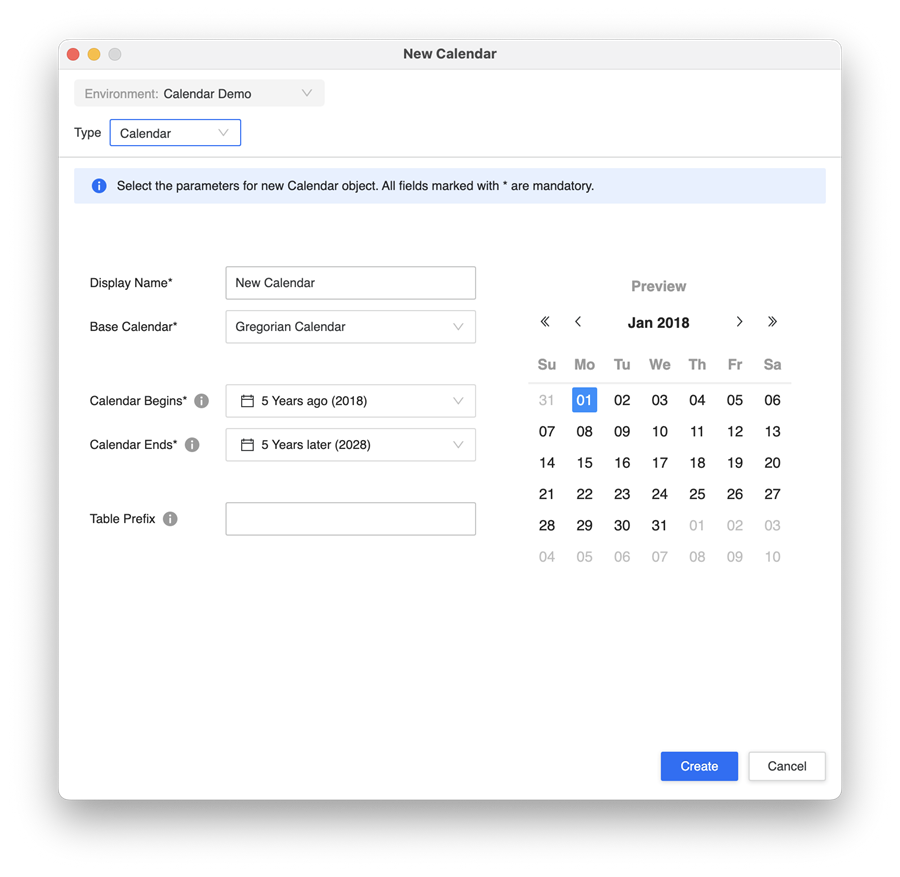
-
Enter a Display Name.
-
Choose Gregorian Calendar.
-
Assign a static or dynamic date in the Calendar Begins and Calendar Ends drop-downs.
-
In Table Prefix, optionally control where in your database the Calendar tables are created. You can assign a dedicated namespace to keep Calendar tables separate from your data.
- Click Create.
If you choose a dynamic date (for example, last year or 5 years later), MicroStrategy Data Engine will repopulate the Calendar tables automatically when the Intelligence Server machine year changes.
This setting can be overridden for each Data Source under Advanced Properties.
Enable Calendar Based Reporting in a Project and Set the Project-Level Default Calendar
To use calendar based reporting you must enable the feature and set a default default for a project.
-
Open the Workstation window.
-
In the Navigation pane, click Projects.
-
Right-click a project and choose Properties.
Choose Get Info if you are using a Mac.
-
In the left pane, click Internationalization.
-
Turn on Enable Calendar based reporting for this project.
-
In Default Calendar, select a calendar.

Assign Default Internationalization Objects for Users
Internationalization objects cannot be applied to user groups due to possible conflicting rules if users are members of multiple groups.
-
In the Navigation pane, click Users and Groups.
-
Right-click a user and choose Edit.
-
In the left pane, click Internationalization.
-
Select the default internationalization objects for the user.
Troubleshoot Calendar Based Reporting
Why does an error occur when a cube, report, or dashboard is executed after applying a calendar to a project?
Each calendar object needs to create lookup tables in the warehouse using the Calendar Builder Report. The following error will occur on the first execution of the cube, report, or dashboard. After the lookup tables are created, the error disappears.
Error = Calendar Table Caches are missing. We have triggered a job to recreate the table caches. [MicroStrategy Error Instance: 1B6E1881A0684B209D8F110107DEAE1A]. Error in Process method of Component: SQLEngineServer, Project CalendarTesting, Job 5, Error Code= -2147463803.)Why do modifications to calendar objects not take effect?
Calendar object modifications only appear after you log out and sign in again.
Why can't I access the internationalization blade and why is the calendar object not visible?
All internationalized objects require the Modeling Service to run. If the error appear on an internationalization blade and calendar objects don't appear, the Modeling Service may not be running correctly. To re-mediate this, restart the Modeling Service.
Why does no data appear after I add smart time attributes to a template?
All calendars require lookup or relationship tables that are created in your database. These tables join with the fact table to display data for smart time attributes. If no data appears after adding the smart time attributes, the data range for the calendar object may not match the fact table's date range. Modify the calender object to match the date range of the calendar with the fact table. You should log out and log in again to trigger the Calendar Builder Report which creates a new set of lookup or relationship tables that match with the fact table.
How can I determine which calendar is used when I add smart time attributes to a cube, report, or dashboard?
Calendar information for the lookup table displays in query details. If the object is connected using Live mode, the DQL has the calendar information in the Table Accessed section. If the object is connected using Memory mode, the calendar that is used for translation is listed before SELECT.
Live Connect:
Tables Accessed:
CustCal2MSTRO1G0BPINLXEHMD005MNTH; Interval: [Month interval]; Calendar: [CustCal2]
CustCal2MSTRO1G0BPINLXKAMD007YR; Interval: [Year interval]; Calendar: [CustCal2]
CustCal2MSTRO1G0BPINLXHEMD006QTR; Interval: [Quarter interval]; Calendar: [CustCal2]
In-Memory:
Using CustomCal1 Calendar For America/New_York Lookup\Rel Tables.
select    [NKTZ (Day interval)]@[SADAYID],
    [NKTZ (Day interval)]@[SADAYBEGIN],
    [NKTZ (Month interval)]@[SAMNTHID],
    [NKTZ (Month interval)]@[SAMNTHBEGIN],
Related Topics
KB485831: What are Smart Attributes
KB485931: Locale Formatting and Smart Attributes Support Export to PDF, Excel, and CSV
KB485832: Calendar Builder Report
KB485835: How to Customize formatting for Smart Attributes in a Dashboard
KB485833: Restrict write-back access of Calendar Builder Report
KB485834: Set Table prefix for Smart Lookup Tables
KB485934: After Enabling "Use Locale Default", the Grid Format Differs From the Example